

NE0
-
Posts
658 -
Joined
-
Last visited
-
Days Won
39
Content Type
Profiles
Forums
Gallery
Events
Yamaha Racing News.
Media Demo
Store
Collections
Classifieds
Posts posted by NE0
-
-
Good to hear you've got a new MOT on your machine. I therefore assume you sorted all your starting problems out.
You started a couple of threads in the workshop area but never finished them off to let us know what the problem was
and
One thing that really gets my goat on ANY forum is reading threads that never tell the audience how they solved the problem.
New members will read posts and think, 'thats whats happening to my bike...." but never find out the actual cause, especially when there are multiple solutions.
It only takes a couple of lines... Thanks guys you were right, or nope turned out to be a damaged monkey reciprocating lubricating screw!....or whatever

thats it..moan over!
Well done for the new MOT
-
I'm not far from you Jams
I too went to bikes and it was the same then, its all to do with them spending time with you sizing you up and then the customer goes off and buys it online cheaper. So its a valid point.
I also tried Cissbury leathers just outside of Worthing and Alfs in Worthing both let me try on helmets no problem, but they didn't have the colour I was after.
I ended up at Helmet City just the other side of Crawley/M25 area,bit of a drive , but I tied it in with taking the children to the small zoo there. I tell you... bloody good service.
Highly recommended. Hundreds of helmets, all colours all sizes and all in stock.
Well worth the visit. I got a Shoei raid2 to match the colour of my 400/4.
-
Turned out that the float valve in the carb was stuck from the residue of old petrol
So I guess a 'thank you' would be in order.
-
Invaribly fuel coming out of the overflow is caused by the float 'stuck' in the down position allowing fuel into the carb from the tank.
My 400/4 has 4 carbs and one occasionaly tends to stick after I've stopped. But its a bugger to get at so it will have to wait until they really need to come off! keeping the petrol tap turned off after stopping solves the problem. (it only happened about twice last year hardly regular but I know the cause)
In your case stale petrol may well have gummed up the float pivot, or the float axle part.
I did say in your previous post cleaning all the fuel lines and ways is essential.I also noted that your earlier problem was caused by
the float valve in the carb was stuck from the residue of old petrolI don't think you cleaned it enough.
As Paul says don't try correcting problems when its caused somewhere else and often the simplist explanations are the main cause.
I think you really need to clean everything inside and out. A carb strip down is just that, you strip it right down to its component parts and clean everything. If there's one bit of crud on the axle pivot the float will stick and you will have problems.
Every little nook and cranny needs to be so clean that you'd be confident you could it your dinner off it!!
-
Expecting a bike to start after a few years of storage is a bit optimistic.
Its surprising how the damp penetrates everything and old petrol literally gums up the works!
Over time stale petrol will lose its ginger and if left in carbs even for a few months it starts to coat the workings with a shellac type varnish. Its a bugger to get off but cleaning all the fuel lines and ways is essential. Spark plugs seem to absorb damp, and so does the HT side of things. Spraying WD40 over everything does help, but I'm afraid if its been a few years since it last started you've got a bit of work to do.
However, stick to it once you've got her all cleaned and dry with new petrol, you stand a better chance of starting the ol' girl....
-
Part 6 Avoiding the Big bang
How to connect it all up
Changing over to 12volt is hassle free, There is no need to cut any wires of the original loom, so if you don't like it or you're not happy reverting back to 6volt is easy.
Don’t be tempted to install the battery first then turn the lights on! its not a good idea as all your 6volt bulbs won't last very long!
Changing all the bulbs is clearly straight forward and obviously should be done first!
The indicator flasher unit needs to be replaced along with the bulbs,
(I did try seeing what would happen with the 6v one still attached but it flashed far to slowly,) The flasher needs to have the two pins at right angles, and rated at 12v 18w~23w.
A suitable one is a universal type WRE04 and comes with the rubber mount.
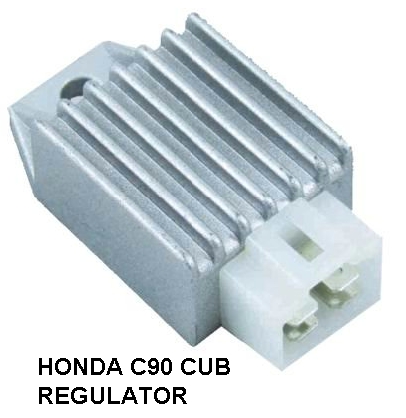
The combined regulator/ rectifier used is from a HONDA C90 cub G model
4 pin version suitable for a late 80’s. bike. SH570-12 / 6.7 011
I mounted mine next to the indicator flasher so the wires from the original rectifier attached directly. The C90 regulator has a separate earth tag so does not need to have the body in direct contact with the frame, so for the moment I just secured it with a couple of cable ties.
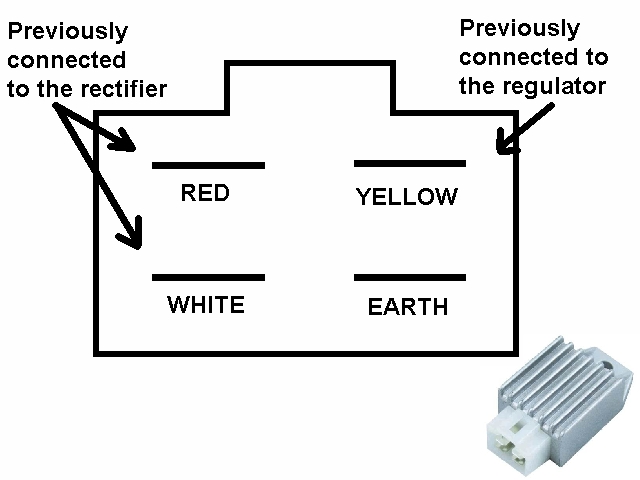
Once you’ve secured the reg/rec then unplug the old 6v rectifier and plug them into the positions in the diagram. The C90 reg has all 4 Lucar male spade terminals. My old 6v rectifier has a male and a female connector, If you want to keep the option of returning the bike back to 6v, don’t cut the male spade off just make up a short female to female connector to connect the wire from the rectifier to the new one.
Disconnect the old 6v regulator and run a new length of wire from that connector in the loom to the New reg/rect as shown.
Finally connect another length of wire as an earth lead and find a suitable Earthing point.
As I fitted the new reg/rec next to the indicator flasher, the lead can connect to the common earth under the HT coil.
The Main headlight will now run off the generator. The rest of the lights and horn will, as before, run off the battery. Only this time it’s 12volt.
That's it! Simple!
If it doesn't work out for you, you can swap it all back to 6volt. No cut wires.
I'll report back on the success of project "Firefly" soon.
So far everything works perfectly. Not had to externally recharge the battery.
Hope you enjoyed the posting its taken quite a few hours to write it all up.
References:
Yamaha Haynes workshop manual 210 ISBN185010 3003
Mastering Electronics john Watson ISBN 0333 408233
Hillier's Fundamentals of Automotive Electronics V Hillier ISBN 0748726950
Automobile Electrical and Electronic Systems ISBN: 0750662190
Yamaha club forum, Honda C90 website,
Remember this is a 12v conversion for a 1978/79 DT 175 MX UK
2K4 and 2X2 models. I’ve also checked the Haynes wiring Diagrams for UK 4J4 which is compatible.
Yours may be different and may require additional research before converting -
Part 6 contains all about the regulator, should be done before the weekends out....
-
Part 5
What needs to be changed and how much will it cost!
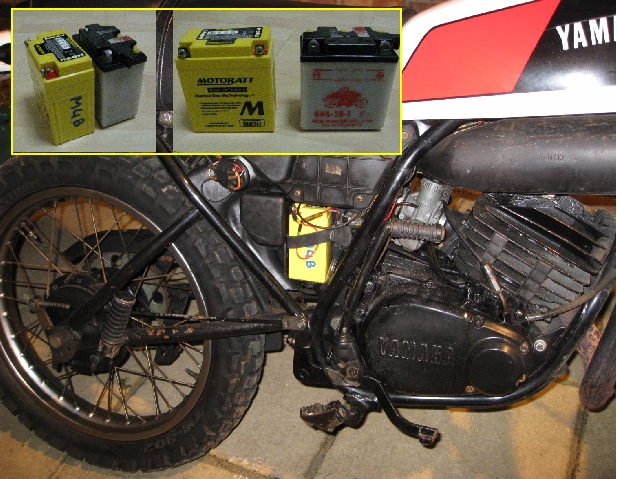
The biggest stumbling block in the past is trying to source a 12volt battery small enough to fit in the same space as the 6volt one.
Well, good news folks, there is one…hurray!
Battery codes are : YB3L or FB3L or CB3L
The dimensions are:
Length 98mm Width 56mm Height 110mm (the 6volt one is 6N6-3B-1 : 99mm x 57mm x 111mm)
These 12v batts are listed for:
Cagiva 350cc T4R (1987-90)
Fantic Motor 125cc Raider LC
Fantic Motor 250cc Raider LC
Honda LS110 TH (1989-92)
Honda CG125 -IR (1992)
Honda MTX125 RW RW-TH (1985-90)
Honda NZ125 (1993)
Honda NSR150 R R2 (1994-98)
Honda MTX200 RW (1985)
Honda XL200R (1983-1984)
Honda XL250 R (1984-87)
Honda XL250 RC (1982-83)
Honda XL250R (1982-87)
Honda XL350R XR350R (1984-87)
Honda XL500R (1982-87)
Honda CRM50 (1993-94)
Honda MBX50 FW FWD S SD SWD (1985-87)
Honda MTX50 FR RS S (1985-89)
Honda NS50F NS 1 (1990-99)
Honda NSR50 A F (1987-95)
Honda XL600 R (1983-87)
Honda CRM75 MTX75R (1989-94)
Honda MBX75 FW (1983)
Honda NSR75 (1992-1994)
Honda MBX80 SW SWD 2 FWD (1985-87)
Honda MCX80 S (1983)
Honda MTX80 R2 RS (1987)
Kawasaki KDX125 A1-A4 SR (1994-95)
Kawasaki KDX125 B1-B4
Kawasaki KDX200 B1-B2 (1984-92)
Kawasaki KH125 K7 - K10
Malagutti Runner VS Rally (1987-90)
MBK 50 X-Limit DT50 (1997)
Yamaha DT50 R (1989-1997)
Yamaha V100 (1993-94)
Yamaha DT125 LC (1984-87)
Yamaha DT125 RE (1988-96)
Yamaha RX150 (1995)
Yamaha DT200 RE (1993)
Yamaha SDR200
Yamaha XT250 (1984)
Yamaha XT350 H N (1985-00)
Yamaha XT500 (1986-89)
Yamaha DT80 LC LC II (1983-96)
Yamaha RD80 LC II (1983-86
I used the AGM Motobatt gel battery MB3U order code ASIN: B004EE2I62 available from Mad4bikes via Amazon.co.uk (cheaper than ebay) £19.99 (02/2011)
The conversion will require:
12 volt battery (see sbove)
4 x indicator bulbs 12v/21w
1x tail/stop bulb 12v 21/5w
1 headlight bulb 12v/35w
1 pilot bulb
6 x dash bulbs (oil. Neutral etc)
1 x 12v flasher unit
1 x 12v Combined Regulator/rectifier
2 lengths of wire and connectors
I already had all the bulbs from my car spares and box of bits kept over the years. I had to purchase the battery £19.99 and the flasher unit £3.50 from the local car accessory shop. The 3 hole headlight bulb came from a buy it now on ebay for £1.75. The regulator was on ebay for £4.99 no one else bid! New ones can be obtained for about £15. Postage was free on the battery!
The cost to me was under £30 and most of this was the battery!
If your aging 6v battery needs replacing then for a little more expense you might want to consider the conversion……
Part 6 next how to wire it into the DTMX
-
Am I not winning you over?
I wasn't able to buy a headlight bulb in anything higher than a 35w one.
But the taillight is noticeably brighter and at higher speed the headlight,I must confess, does look brighter to me.
However, I think the upgrade aspect for me comes from having a 12 volt battery to deliver much brighter indicators a brighter brakelight and a more powerfull horn. You can't run an airhorn off 6 volt.
If the car user can see my intentions and the pedestrians move when they hear the horn, then surely its got to be worth it?
-
Part4a That little coil beavering away!
The measurement for Power in electricity is the WATT.
that little coil produces 0 to 20v plus on the charge circuit
and 0 to 16v on the lighting coil
On the 6v original system the Bulbs on the lighting circuit
Headlight and 3 instrument lights
all add up to 45.2 Watts
(The indicators,flasher unit,tail/brake,pilot,neutral,oil,indicator telltale and horn all run off the battery)
The total wattage is 35w +10.2w = 45.2Watts
(3.5w x3 =10.2 main beam tell tale + 2 x instruments lights)
Thats the POWER of Watts the lights use, its probably not the limit of the wattage the coil produces
If we replace all the bulbs with the same wattage but in 12volts
the wattage remains the same, its still 45.2Watts
the total AMPS used by the 6volt system is 7.5Amps (45.2w/6v) (Amps=Watts divided by Volts)
the total Amps when its 12volts will be 3.7Amps (45.2w/12v)
The difference is the coil produces 6 volts at low revs but generates over 20 at high revs.
To produce 12volts at low revs there needs to be more windings the Watts output may well be lots more but the lights will still only uses 45.2watts maximum
I think I know what your concerned about but its the Watts which are the key.
If you turn on two 60watt bulbs indoors you still use 240volts but consume 120watts of Power. you don't have 480volts going through the mains.
Does this help?
I'm busy writing the next few parts....Its almost exciting isn't it?
-
Oooops I must confess my knowledge is a bit limited on the various models.
My research comes form the forum and the ol' Haynes manual.
I've corrected my posts to reflect this.
-
Part4
Any other options?
My original inspiration came from the post about fitting the Honda C90 stator plate and CDi unit as a whole into the DT.
The way it is described suggests you have to sacrifice your flywheel to obtain the collar part to fit the C90 flywheel onto. The two flywheels fit but are not aligned with the woodruff key and the timing needs to been adjusted.
Swapping the entire stator plate means you also sacrifice the DTs own CDI unit which works fine as it is, You have the potential to lose the power of the spark at high revs, which is why my DT has 2 source coils for this.
The other concern is on the DT the pulser coil is on the inside of the circle so to speak, on the C90 the pulser is on the outer circle and will only fit in one position in the crank cover, hence the reason why the timing needs to be adjusted as its all slightly misaligned.
Going by the original poster he got his DT working with this set up, but he never got back to us to tell us how successful it actual was.
Anyway I don’t want to replace the CDI unit on the DT the set up works just fine. It’s the lights which are the problem.
The potential good news is if you really want to swap the 6v lighting coil for a 12volt one, the C90 is 12 volt and the unit on the whole is the same size as the DT, which means the lighting coil may fit providing the magnets of the DT flywheel give it clearance and the fixing holes are the same.
The other promising part is that the C90 has a large following and many alternative hybrids utilise the C90 engine.
Which means new dirt bike stators to go on C90 based engines are easily available and they are all 12 volts, including the lighting coil. Even better they are all under £20 new.
However, I kept the 6 volt lighting coil, because of its power output as seen in the photos. Which also means you don’t need to worry about removing the flywheel, well not today anyway!
Still interested? Part 5 shows the parts needed to make the 12v conversion,
-
The regulator has no other purpose than to stop you blowing headlight bulbs, it has no function in the charging of the battery,
Don't shut up mate, but the regulator is involved in the charging circuit.
Part 3b The Regulator
As you can see from photos the white wire output (charging coil) is over 6volt in fact it goes well over 25 volts, what stops this increased volts frying your battery as you ride? the regulator.
On the 6volt regulator, it clips the volt to 6 volt, in your words its acts as a soak, which is probably a better description it certainly gets warm which is why it has those cooling fins, but it has an internal threashold which means, it 'soaks up everything above 6volt.
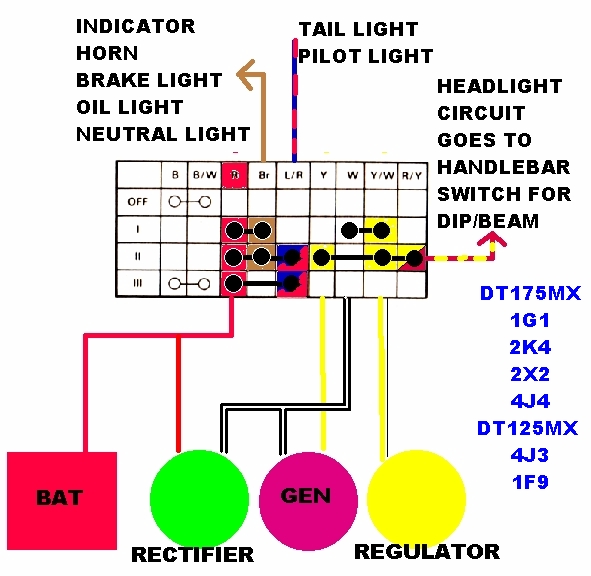
Take a look at the wiring diagram of the DT and the internal switch arrangements.
[from generator:- Lighting circuit yellow wire:charging circuit white wire]
In position 1 on the ignition switch, (engine run on lights off) the white wire from the generator goes to the switch and is connected to the yellow/white wire to the regulator. In essence soaking up the excess volts which would fry the battery.
In position 2 (engine run, lights on) the yellow wire from the generator is switched to the yellow/white wire to the regulator. The tail light and pilotlight (parking light) are both on drawing current from the battery.
Switch the headlight on, the regulator 'soaks up' the excess current, in essence, and you're right, stopping the bulbs blowing.
This 'draw' on the circuit causes the field in the generator (remember its the same coil) to partly collapse, thereby reducing the output from the white wire which prevents the battery frying.
Elementary physics? or have I turned into brian cox!
Here's a simplified diagram from later on in this thread, brought forward here to show the connections.The block shows the connections within the ignition switch making up the circuits in the various key positions of I, II, III.
-
Part3 The lighting coil
Let there be light.
My Dt has three coils, Two source coils which are attached one on top of another and are part of the CDI (electronic ignition) One of these creates the spark at low revs the other at higher revs. Used together this way, maintains the spark across the revs range.
The other coil is the lighting coil. It has two windings over one core. One winding terminates as a white wire and is responsible for the charging the battery. The other wire, the yellow wire runs the 6v lights.
Because it’s only a small coil, (12 volt coils have more windings) it’s output is limited. Nonetheless, it will still generate 12volts. The trouble is you don’t get something for nothing and it takes a lot more revs to do so
With the engine running and the generator disconnected from the rest of the bike, the output is as follows: Read the RED scale on photo below of the meter for AC volts.
Yellow wire (lighting circuit)
2000 revs = 6v
4000 revs = 11.5v
5000 revs = 14v
6000 revs= 16.5v
It’s the function of the regulator to ‘clip’ the voltage to 6v thereby maintaining the 6volts across the revs range.
White wire (charging circuit)
2000 revs = 11v
4000 revs = 18v
6000 revs = 26v
this wire is the charging circuit and it too is clipped by the regulator so the voltage remains steady. This circuit also runs through the rectifier. This device can be likened to a one way valve and ensures the voltage only goes in one direction to charge the battery.
So it can be seen that there is 12 volts output from this coil, but you need higher revs to get it. the other factor is that changing the regulator to a 12v means the voltage will be clipped to 12 volt above 4000 revs hence the reasons the lights go dim on tick over and up to about 3500revs. (you can’t tell 11v from 12v)
In theory you could run the lights off the charging circuit and use a 12volt regulator to maintain the 12 volts, but you wouldn’t have anything to charge the battery. Having said that you could simply run everything off this circuit without a battery! I might give it go just to see what happens!!READ THE BOTTOM RED SCALE FOR VOLTS
Reads: 0-5-10-15-20-25-30
Part 4 next, any other options before we start! -
Part2
A bit of theory Einstein. Any concerns about wiring.?
Will the wiring for 6v be ok for 12v?
Yes it will. Its all to do with amps and a few electrical laws
Do you recall at school, you only needed any 2 values to get the third?
Volts = watts divided by Amps V=W/A
Amps = Watts divided by Volts A=W/V
Watts=Volts times Amps W=V x A
Not very inspiring is it? Let me apply it to the DT.
The main headlight uses a 6volt 35w bulb
As we have the watts and volts, so we can use the above equation to work out the Amps it uses. This can be written as 35W / 6V = 5.8Amps
so the wiring deals with 5.8A simple? Eh?
Therefore, if you replace the bulb with a 12v /35W one.
35 w / 12v = 2.08 A
The Amps loading is half and subsequently the wiring does not need replacing. Of course you need to add up all the bulbs on the circuit to get the total number of amps the wiring has to cope with, but it will always be half the amps the 12volts needs when compared to 6volts.
Or you can look at it another way in fact 6 volt wiring has to cope with MORE amps than 12v. Clear as Mud I hear you say!! Trust me this is how it works, the wiring will be fine.
However, My DT175MX's wiring is now over 30 years old and one of the reasons it failed the MOT was poor earthing. Unfortunately, it wasn't just a clean up of the frame ground which allowed the lights to work again. I had to clean up EVERY contact. All the connectors were badly tarnished, the wiring in places is quite brittle and on closer inspection the copper wire has gone green. This increases the resistance of the wiring and means the electrical flow will be impaired adding further problems.
All these are signs that over 30 years the atmosphere had got into the copper and oxidised it. At the end of the day, nothing last forever, and the 30 year old loom will need replacing. I'm only replacing mine because its old and the resistance is higher, but all the conversion was done on the existing loom.
Part3 next..the lighting coil
-
My plan was to convert my DT175MX from 6 volt to 12 volt and if it worked then do the write up.
However, a fellow DT rider, kiln was also doing something similar but had only upgraded the regulator and bulbs.
So I brought forward the write up but the project is not finished yet and I can't say that it works 100%.
(as I've not had enough time to evaluate the success.) I may have to edit this post in the future!
i can say it works 100% I updated the topic after 9 months of use at the end.
Disclaimer. This is what I did to my own bike, i can't be held responsible if you fry your electrics or your own bike if you try repeating it.
It's up to you to satisfy yourself that the advice, solution, method is right for your bike
Part1.
Why ?
As many of you will know the DT175MX and I'm sure many other bikes are 6volt.There are many reasons why manufacturers use 6v instead of 12v
They don't fit 6v for the fun of it, after all they spent their money doing the research. However, a lot will be to do with physical sizes of the generator itself and to some extent the space available for the parts to be stowed on the bike.
The late 70's, early 80's DT range is one of these bikes.
It has a physically small generator in comparison to other bikes around during this period. Many bikes of this time were 12volts, but their generators were much bigger, afterall you don't get something for nothing.
The good news is time changes many things. I can't imagine many new bikes today are 6volt, advances in Electronics and technology will ensure you don't ride around in the dark!
Some guys in the past have tried to convert their bikes to 12v some clearly fail and some no doubt succeed, I hope to be one of the latter!
I purchased my DT175MX at the beginning of 2011, two weeks later it failed its MOT...on the lights and horn. They were not adequate for the test: whilst the indicators did indeed flash, the brake light thought it was an indicator too.
The horn sounded like a fart, and not a very loud one at that!
The culprit was poor earthing, but once fixed it did all work, but it wasn't a sound and light show.
The MOT guy suggested converting it to 12volt to avoid problems like this in the future and was confident there was probably a 'kit' somewhere which would do the trick. Sadly, after many hours of trawling the net I couldn't find one. There are indeed plenty of 12v conversions for other bikes, just not the smaller DT range, but one thing's for sure they weren't cheap either!!
I then spent more hours trawling the net and came across the post in the forum about the guy who swapped his magneto over for one from a 12volt Honda C90 cub,
Take a look here the trouble was he never finished the write up and never said it worked without any problems..maybe he set fire to his bike in the process.
Nonetheless, the very fact that a modern 12volt system could be, in theory, transplanted into the ageing DT filled me with inspiration. I set about doing my own home work and started project 'firefly' (Small glow-worms which emit very small amounts of light just like a DT175!)
Part 2 to follow -
Hi guys
I bought my DT as a winter commuter bike, Its being well used in all weathers, and I've clocked up over 280 miles already and I've only had it for 6 weeks.
Now I'm looking at putting a rear rack on it for my works bag and chain etc, might even put a removeable topbox, but first i need a rack.
I guess the chance of finding a new one specifically for the MX will be remote, nonetheless I thought I'd ask.
Does anyone know if a another rack for another bike just happens to fit? or is it a case of make your own/DIY?
or any other ideas.
I found this photo on the net, i don't think it looks too bad at all.
However, before anyone says don't do it, use a rucksack etc, my bikes not going to shows or anything.
Its stricty a working bike, it's unlikely to go green laning, and i've had enough of my rucksack!
-
£1.80.. I didn't even get that as change from a tenner!
in fact i got £1.20.. I must have been running on vapour!
Nice to know the mileage is expected. I'll keep on eye on the mileometer!
...and I MUST remember to keep the oil tank filled up.
I assume it will need to be topped up around the same time as the fuel?
-
Hi Guys
Been using the new bike for a few weeks now , rain or shine...mostly rain!!!
Got unbelievably soaked on Saturday during a 40 minute downpour, but heh I'm using it!
However, it didn't help when it died at the lights! thinking it was the rain I was frantically kicking it over much to the amusement of the car drivers behind me, although in the downpour I'm surprised they could actually see me.
As I rolled it over to the kerb I noticed the mileometer (odometer if your pedantic
) with 90 miles, I remembered I did zero it when I filled up last, a quick turn of the petcock to reserve and it sprang into life!...and it was still chucking it down. Good old DT.I don't know how big the reserve is so I filled up at the nearest station...just as the rain stopped!
So I was just wondering how many miles do you fellow 175MX riders get, is 90 about right? less? more?,
-
Well Guys you certainly know your stuff.
My bikes cured!!!
All three engine mounts were loose, the back top one was only finger tight!
the other two were not as bad, all three have now been torqued up.
Plus the swinging arm nut was not as tight as it could be, nearly a full turn before the torque wrenched 'clicked'
I guess the clues were there in my intro , the frame had recently been stove enamelled, like past 6 months
and clearly whoever did the work didn't tighten it all back up again.
this prompted me to check all the other bolts , one bottom fork nut was also loose!
All in all I'd say the vibration was 95% gone. It's not as smooth as my 400/4 so my expectations are it bit misguided! I expect you get a slight vibration from a stroker (trouble is its been 34 years since I was 16 and riding them!) But I'm a happy man again!
so the drinks are on me , what will you be having guys?
-
Thanks for the quick replies guys,
Neither of you wanted a pint then?
I'm not over keen on taking it off the road just yet to rebuild the engine having only just got the bike.
So I won't be stripping it down in a hurry and even more so when I don't need to..
I will check those items tomorrow and get back to you all, (providing I can get the time!)
some more details for you...
Cynic, it is only noticeable on throttling or cruising, soon as you throttle off and remove the load on the engine the vibration stops. On tick over it sounds just like any other stroker.
I did wonder if it was speed related so i took it out this afternoon, and no its not.
You can ride at 20 or 40 an its only noticeable when the engine is throttled up!!
(Gee isn't that what happened to the shuttle Challenger? you are clear for throttle up....Kaboooom)
cut the revs and it goes.
Its quite a harsh vibration which you feel through the pegs first and then it feels like it makes the frame vibrate. Don't get me wrong its not shaking, its a rumble vibration.
I did take out the plug a few days a go just to check , it was not oiled up but a nice brown.
Its not difficult to start, one or two kicks, but certainly harder if the engines hot.
If any of this helps?
Cheers...don't forget your pints guys....
-
Hi guys,
I’m up at the bar looking into the bottom of my empty glass!
Let me buy you a drink, and tell you the problem with my DT175MX
I’ve only recently purchased it to go with my CB400/4.
It’s a 1978 registered early 79. Its got 19,300 on the clock, seems genuine as it came with MOTs dating back past 20 odd years.
It had a rebore at 14,300 including 2 main bearings (not the big end).
In the past week or so I’ve noticed it has a rumble under load, it’s a vibration which travels through the foot pegs, take the revs off and the rumble disappears, go back up through the gears and it becomes more noticeable.
I’ve only had it a few weeks so in all the excitement I may have not noticed the rumble, but as I’ve ridden it more its certainly there!
My thoughts are is it’s the big end…....
So what will you have?
-
Welcome Budunt,
Not the greatest start but credit where credit is due...this thread has the HIGHEST number of views in the Noob section
well done.
-
Many thanks for the welcome.
If it’s of any value to those who have an interest in numbers, the frame/engine are in the high 3900’s so If it started at 000001 its under the 4000th made! , It was registered in early 79.
It’s got the characteristic round tube swinging arm, and the smooth side panels. There’s also a short front mudguard which causes spray all over your chest in the wet.
On the back is a rubberised mount for the tail light and plate.
It passed it MOT today…horray
, but it did fail a few days before!! The frame has recently been stove enamelled but the frame earth was not cleaned back to bare metal, so all the lights were dim and flickering. A good clean of all the contacts and a good frame earth ensured a pass today.
I’d like to convert it to 12volts and read with interest the post in the main forum of a conversion but the thread was unfinished. I’ll keep doing my homework but its certainly on the to do list….eventually!
The 400/4 is my pride and joy and I restored it to its present condition about 10 years ago, I’ve kept it nice and have on occasions showed it at local transport festivals. If I could find away of riding both together I could show the DT along side it!
All the best NE0


 ) with 90 miles, I remembered I did zero it when I filled up last, a quick turn of the petcock to reserve and it sprang into life!...and it was still chucking it down. Good old DT.
How to choose my helmet??
in General
Posted
Snap!
Mines a wine red one, its a very nice fit and I'm very pleased,
I bought mine last year when they had the sale on and it was well under £180...not that you want to hear that!
see I told you it was bloody good service...they really are the dogs dangly bits.
well recommended.
(what colour did you get?)