

Ventura
-
Posts
82 -
Joined
-
Last visited
Content Type
Profiles
Forums
Gallery
Events
Yamaha Racing News.
Media Demo
Store
Collections
Classifieds
Posts posted by Ventura
-
-
So...................
Its looking more like a bike again now.
Got all the wiring done, headlight and clocks back on. Just waiting to fit the original bars and back light unit.
Oh, and the engine of course!!

Getting there!!...........
V.
-
In order of (my) preference..............
Hagons....
http://www.hagon-sho.../wheels2011.pdf
Devon Rims.....
http://www.devonrimc....com/prices.htm
Central Wheels.....
http://www.central-w...kes/spokes.html
Ive used all three.
In all cases I'd ring them to order and to enquire on availability.
Hagons have a great database of spoke specifications for a multitude of bikes and usually will deliver within a week.
To be 100% sure you could always send a sample of the 4 different spokes.
Just to be sure!!
I just paid £70 from Central Wheels, but their delivery time was far too excessive compared to others.
Not so bad if the bike is in bits anyway, but not good if you're using it!
V.
-
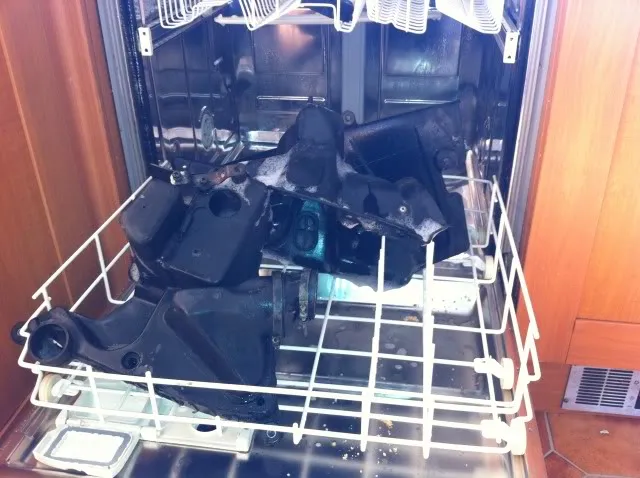
Well now!
Working on the premise that Im already in the dog-house for using the dish washer for bike bits
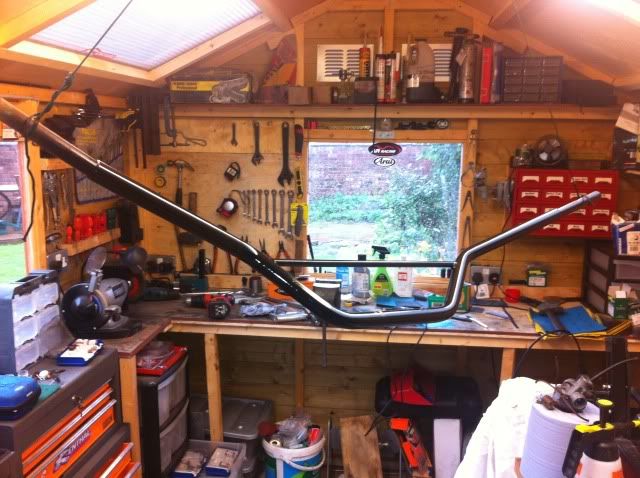
, I thought I might as well go the whole hog!!.............The DT is rolling again!!
Got the wheels sorted and back on (albeit very loosely for now) and freed up some room in my shed so I can do a bit of sorting in there.
Once I've tidied up I can then start on the engine.
And maybe while the bike is in the lounge I can sort out the wiring loom in warm comfort!!
NB.... If this turns out to be my last ever post then you'll know what happened when she came home from work!!
V.
-
Great program!! Well worth recording!
And amazing to see the great Dave Aldana racing at the grand age of 62!!
And doing very well too.
On Any Sunday....... The modern-day UK version!!
V.
-
Thanks for the replies chaps.
Ive had a look on-line and it seems there's a world shortage of PJ1 satin at the moment!
But the Plasti-Kote BBQ is freely available (even B&Q has it) so I'll give that a go I think.
Today Ive been doing a bit more cleaning of various bits and pieces.
And found a very good, labour saving, method of getting the black plastics pretty spotless.
Brought the airbox up a treat!!............
(NB... This method should only be used when the missus is out of the house for at least a couple of hours!!
)There may be dire consequences otherwise!
V.
-
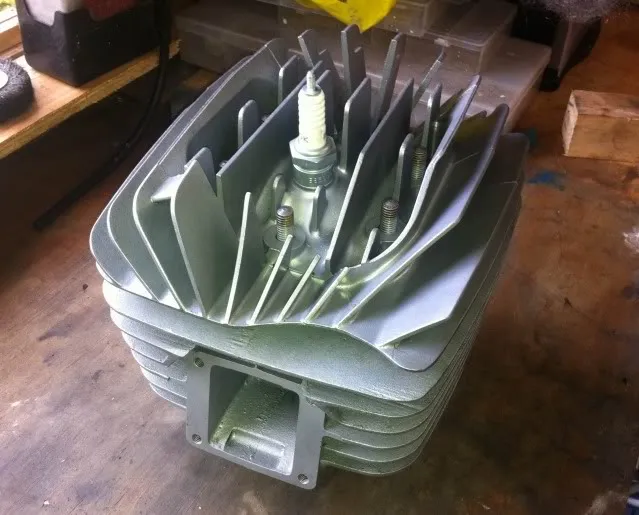
After a couple of weeks away from the bikes (unfortunately having to work for a living
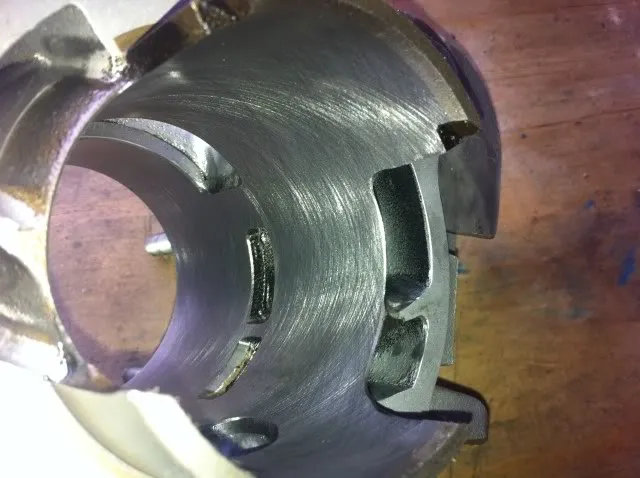
) the DT project is slowly progressing again.The barrel and head have been aqua blasted to good effect and the bore taken out to +1mm and honed.
Nice job..........
So, my question now to those who've been here before, which black paint am I going to use for the barrel/head?
I've trawled the forums for advice and it seems that PJ1 satin or Plasti-coat BBQ paint is the preferred choice of many.
Any advice or comment on this would be greatly appreciated, then I can make a start!!
The wheels should be rebuilt this week so am keen to get them back on and get the frame rolling again.
Need some room in my shed to get started on the engine tear-down!
More to follow!................
V.
-
Washing up liquid works well, but you do have to keep reapplying.
Its cheap tho!
Or why not try an Oxford insert......................
Not too expensive and certainly does the trick!
V.
-
Awful news!
Marco will be sorely and sadly missed.
V.
-
The new replacement seals are single piece, 12mm wide seals.
Unlike the originals which were in 2 Individual (upper and lower) parts.
V.
-
I gave them seat spike things a go, I know staples are the usual way though, the spikes are really made for the metal pan seats
I had a look at those spikey things. Did you use pop rivets to attach them?
I was a bit worried that it'd crack the edge of the plastic pan when riveting them on. In the end it was the roughty-toughty staple gun sorted it!
Great story boys" keep them piccy"s coming Ace" [ ventura] , esp when paintwork is on ,,,
Only pics so far are here, taking pride of place on the dining room table!!
But why not eh!
..........Whatcha' think??
V.
-
Weimieman, your quite right, having a tardis to work in helps greatly!
Good luck with the upholstery job. It really does take a heavy duty stapler to drive those staples into the plastic pan.
Sure it'll work out fine, especially if you take up Nevs kind offer!
Nev, I'll pm you some photos Ive taken of the bike lift and also the front wheel clamp on the hyd platform.
With access to welding, cutting and drilling gear I'm sure you can knock them up fine.
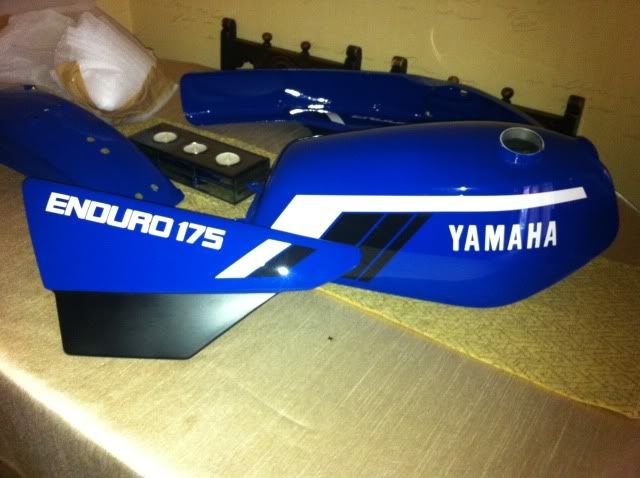
Ive just picked up the tank and plastics this evening from the paint shop.
What a fantasic job he's done. Better than new!
Photo's to follow!!
V.
-
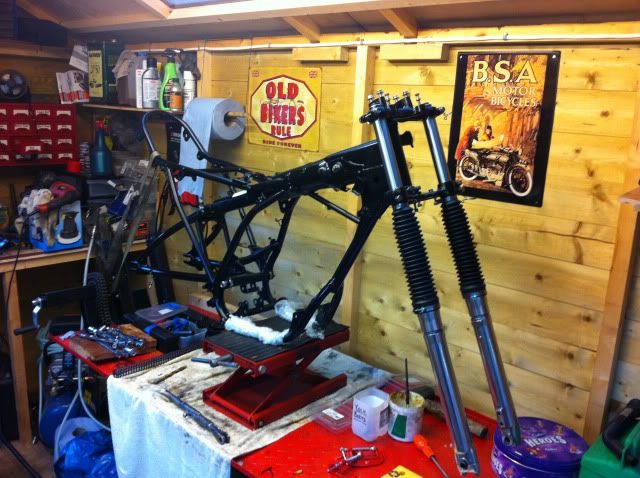
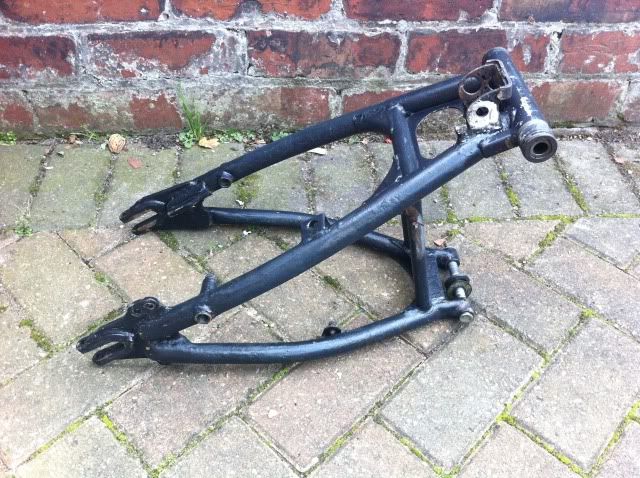
Well now, after a little time away, the rebuild has begun!
The powder coating and the fork rechroming turned out great!
So couldnt resist starting to put things back together a little.
Swing-arm and yokes reconnected (with all new bushes and bearings) and very shiny forks loosely back in place......
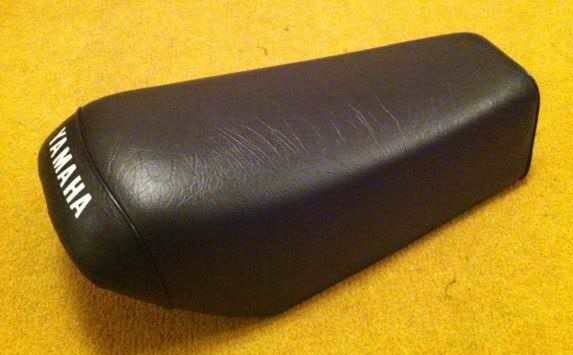
Also managed to get the new cover on the seat.......
And picking up the tank and plastics tomorrow.
All good fun (so far!
)V.
-
Not fair i want your shed
LOL Cynic!
I built my shed last year from a big pile of wood. Its a custom job!
The kids call it my man-cave, and it comes complete with beer fridge!
But now, since starting on the DT, it isn't big enough any more!!
I need to make an extension.
hey v i missed your earlier postings, that thing in the bottom of your fork stacheon should come out easily, its aluminium about 40mm long and parallel at the botton...tapered at the top. it has to come out the top, if you bang the top of the leg on a wooden block it should drop outCheers for the advice Paul.
I ended up taking the stanchions in as they were, the chroming guy said that wasnt a problem as they plug the ends when they go in the dip-tank.
Cant wait to see the end result!!
V.
-
I haven't posted for a while, but the project still continues!
Ive spent most of the recent time randomly cleaning, buffing, and polishing a lot of the bits and pieces which Ive removed as time has allowed.
The fork legs have come up pretty well!!..............
My recollection is that they were never that shiny when new, but they are now!!
The frame, swingarm and yoke are at the powder coaters, and Ive been rattle-canning a lot of the black bits and pieces.
Ive made the assumption (I hope Im right) that the bars were originally black.
I removed a layer of black, a layer of blue!, and another layer of black as I stripped them.
They're nice smooth and shiny black again..............
While the polishing mops were out I had a quick go at the carb too, which is coming up well.........
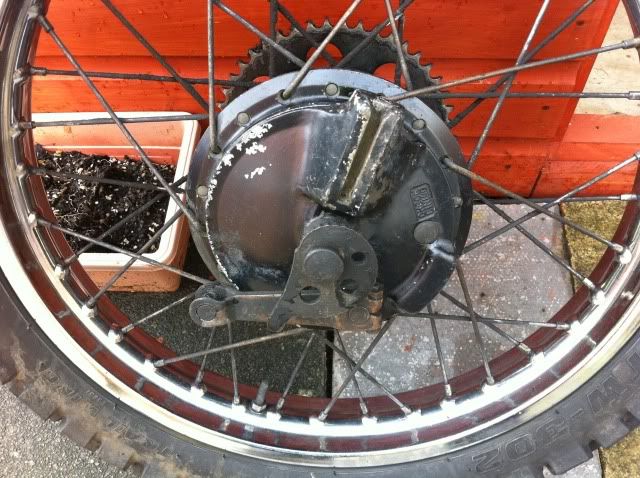
The wheeels are apart too. The hubs are in very good condition so all needed is a good clean up and a coat of the shiny stuff.
The chrome on the rims is excellent and can only assume that they were well protected over the years......
The fork tubes are at the re-chromers, and the tank etc are at the paint shop.
I tried doing something to clean up the mudguards and side panels, but everything I tried just made them worse!
So have resorted to the paint shop for them too, as well as the side panels.
So all that lot is to be picked up next week when I get back home again (I work away, for 2 weeks at a time, hence the stop/start nature of the work!)
But it all seems to be progressing nicely.
Any comments or suggestions from you guys would be greatly appreciated.
Oh, and Nev, I was so pleased with the portable greenhouse you suggested that I went and bought another one!!
Many thanks
V.
-
Thanks for the helpful hints chaps, its very much appreciated!
Paul..... Your tip on removing the swing-arm bushes came just after I'd done my Dewhurst butchery best and whacked them out with a long screwdriver! Unfortunately they're now in the bin.
The new swingarm kit is on its way, but to be honest, apart for my attack with the hammer there wasn't a lot wrong with how it was!
Nev.... Good idea on the loom ID'ing. You can probably see from my shed photo that I've taken the tape/pen route initially but when it comes round to giving it some closer attention I'll likely go with your much better idea.
The nuts/bolts/washer numbering is with a view to re-using as much of the original kit as I can. It seems such a shame to change them when everything down to the last original spring washer and split pin are still in place.
If they're still servicable I'll try to re-use, but I've bags of shiny ss alternatives if they're not!
DirtyDT..... Good advice! Ive taken lots of photos so far and am constantly uploading to Photobucket.
Tools Im good for and I have a nice (now decreasing!) Paypal slush fund as I recently had an Ebay shed clearance of all the bits I'd removed from my other bikes. Its amazing just how much accumulates and will likely never be used again!
OK, here's a Q for you guys.......
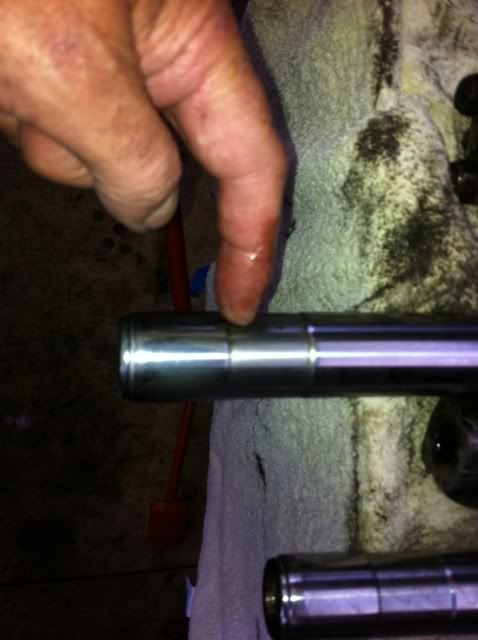
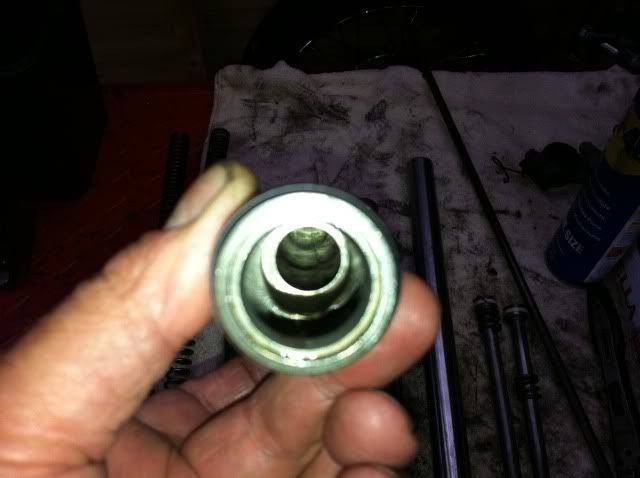
Ive stripped the forks down and have the stanchions ready to go to the re-chromers.
But inside the tube remains a loose washer which the damper rod rebound spring sits on.
Is it possible to remove this? As I say it is loose in the bore of the tube but doesnt want to move either way?
Its about here...........
And can be just about seen in the bore here.............
Any advice would be much appreciated.
Nev..... I got the plastic greenhouse from Argos earlier. They were on sale for half price!!
Excellent idea of yours thanks. Little job for the morning if this wind dies down!
(And I'll be sure to look out for the instructions!!
V.
-
Hi Nev,
Many thanks for your positive and helpful comments.
Since I took those photos of frame and swing-arm I've removed and numbered (how anal is that!) all the bolts, screws, spindles etc.
So every one will go back to the place they came from.
Regarding the prep for powder coating, I'm lucky in that the guy I'll take it to (John Heckle at Elite Engineering + Coatings, Aintree), will do all the blanking and covering.
Comes as part of the service. All I have to do is degrease it!
Excellent idea about the cheap plastic garden greenhouse! Why didnt I think of that!
I'm off to Argos / Homebase right now!!
I just got back from a quick visit to a fork re-chroming works.
Never used them before but come highly recommended. Anyone any experience of them?............
Rockrome Engineering Ltd, Liverpool
The forks are not that bad but the sections between the yolks are fairly pitted so they'll be going in the bath!
Once I've got my greenhouse built, and the shed emptied a bit, think I'll have more of a look at the engine.
Then make up another shopping list!!
V.
-
Not sure how this will all pan out, nor how long it will take, but let this be the start of my latest little project.
Im a newbie round here but Ive been lurking for a while and learning lots from the very knowledgeable guys on the forum here.
Undoubtedly I'll be calling for advice on the hows, why's and wherefores as this proceeds, so let me thank you all well in advance!!
So, the story begins............
As I mentioned in my intro I bought my first DT in 1979, brought it home in the crate and built it up myself.
I kept that bike for a total of 26 years before regrettably part-ex'ing it for something which has long since been and gone!
We learn by our mistakes!
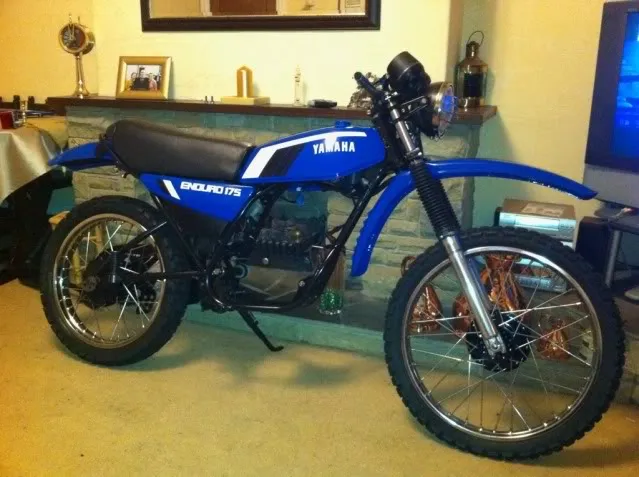
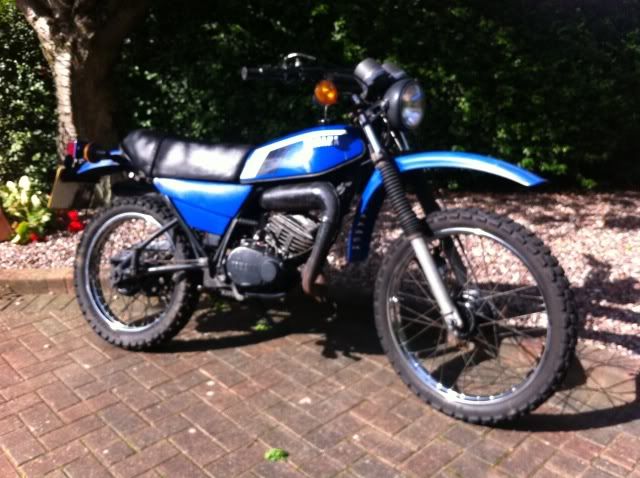
Anyway, after a while searching I brought this little baby home a few days ago..................
(sorry about pic quality. Bad light and iPhone!! I promise to improve!)
A fairly tidy, all original (Im assured!) 1979 DT175MX. One previous owner and nothing much bent, dented or broken.
My plan was to buy a bike and totally strip it down to restore it to its former '70's glory.
(Something I wish I could do to myself too!!
)So, after giving it a few laps round the block to make sure it was a good runner, it was into the shed and on the ramp.
A few hours later, and after owning the bike for less than one day, this is the story...................
And yes, I do need a bigger shed!!
As can be seen its all in bits now.
No major issues found so far. The exhaust will need replacing as its been attacked to many times with a welding rod at the lower bend, the steering head bearings were goosed (and all the balls fell on the floor anyway!) and I had to cut off the chain tensioner as it had seized on the spindle/pivot bolt and no way would it come off.
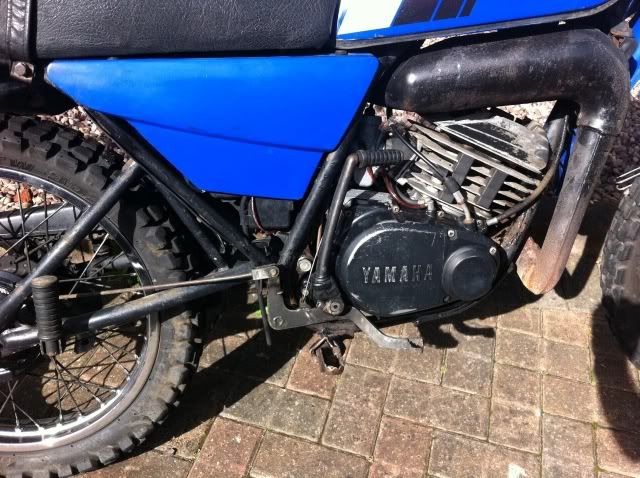
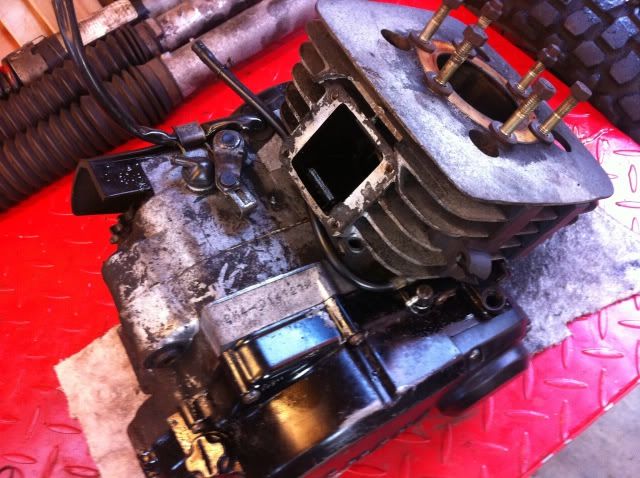
Only got as far as taking the head off the engine so far (couldnt resist). All looks fine, the bore is clean and rings intact.
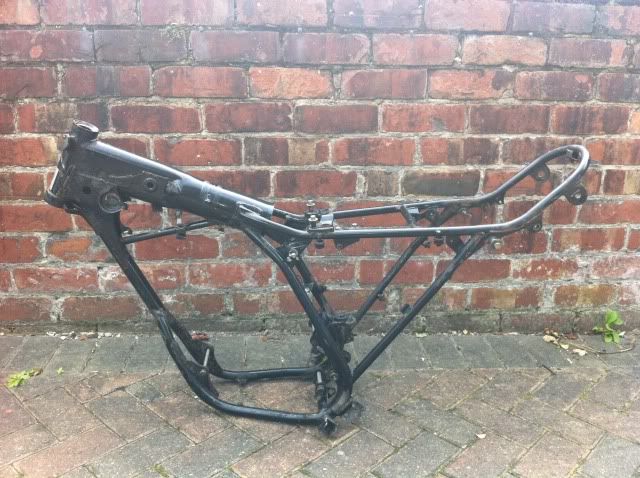
So spent yesterday (Day 3) preparing the frame and swing-arm for the powder coaters.
Before taking it I'll need to repair the slight damage caused by the tensioner spindle turning in its securing plate, causing the hole to elongate somewhat.
Almost ready to go...................
So, first questions for the experts, and I'll keep them easy to start with!!
Were the bars originally chrome or black on the '79 DT175? Mine are badly hand-painted black.
Will I be able to buy a chain tensioner pivot bolt/spindle or will I need to make one? (I saw the photo of Pauls, with the nice grease nipple fitted!)
Were the lower parts of the side-panels originally painted black? (These were, but it all came off with the power washer!)
And will I need to invest in a Haynes manual to be able put it all back together again!!
More to follow soon................
-
Many thanks for the warm welcome chaps!
Well, I've been busy today. The photo above is from yesterday when I brought the bike home.
Got the tools out today and this is how it looks now!!..............
Must be the easiest strip-down Ive ever done.
Nothing at all bent, dented, siezed, rounded or stripped!
I recon this bike must have always been garaged and never been left out in the elements.
Every original screw, nut, bolt and lock-washer was in place just as it left the factory.
The only thing Ive found so far that needs renewing is the side-stand, seat cover and the exhaust.
All to be expected I suppose and everything else, including engine, seems in A1 condition!
So I recon I'll do as I'm told and post a few findings and photos on the 'Projects' thread........
Good to be here guys. Lets see how it all pans out!!
Lookin' forward to it !!
Cheers!
V.
-
Hello all!
Having just rejoined the ranks of DT ownership thought I'd sign up here and let myself be known.
Thought it best that way before I start annoying all by posting numerous silly questions to the resident experts here!!
Briefly, about me..... started my biking in the '70's, firstly with a very beat up old NSU Quickly then the more conventional route of FS1-E, RD250 and my first DT, a brand new white '79 250MX.
I took delivery of that beauty still in the crate and built it up myself at home. Not something which would be allowed these days!
Years have gone by and never without at least one bike in the garage. Laterly a couple of Virago's (when my knee wouldnt bend very well after an accident!) and then a crackin' Japanese imported XJR1300, followed by a couple of Ducati Monsters.
Present harem is two modern day Triumph Bonnevilles (Scrambler and Thruxton) a '71 BSA 650 Thunderbolt and (as of yesterday) a 1979 DT175MX.
All seemingly bog-standard original and fully roadworthy. Just in need of some TLC..................
So, after a few runs around the block to prove all is OK, the strip-down starts today!
Im planning a ground-up restore to its full former glory and (hopefully) with it being such a good base to start from, shouldnt be too much of a problem (says he!!).
Well, thats my (not so brief after all!) intro over. Stand by for the dumb questions now!!
Any advice from our resident experts here would be most gratefully accepted.
Let the fun begin!!
Cheers.
V.

 , I thought I might as well go the whole hog!!.............
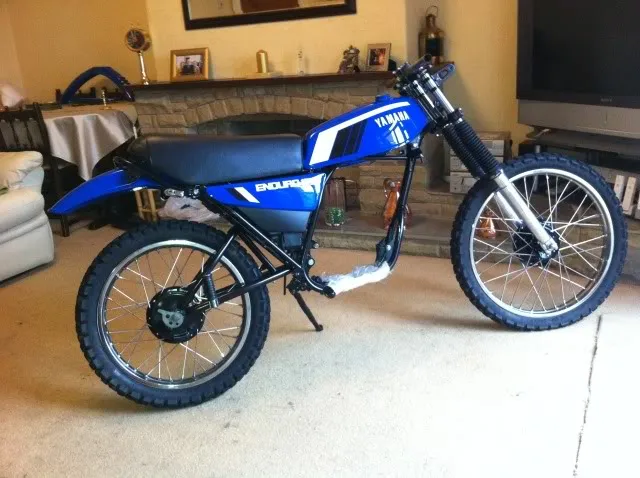


Yamaha dt 125 head warped 1992
in Yamaha Workshop
Posted
Pleased to meet you!!
V.