

DaVinci856
-
Posts
38 -
Joined
-
Last visited
Content Type
Profiles
Forums
Gallery
Events
Yamaha Racing News.
Media Demo
Store
Collections
Classifieds
Posts posted by DaVinci856
-
-
Well, it looks like I've corrected the main performance problem, but mostly as a side effect of fixing a no-start problem and not from incredibly intelligent troubleshooting. It's been a couple of weeks, and I've been tinkering, but not writing.
Short story update - when replacing a piston into the cylinder, it's a heck of a lot easier just to do it with the piston installed onto the connecting rod. After having more problems trying to do it in what I thought should be the "easy" way (with it off the bike), I just went back to the way I had done it many times before and it was quick and easy. I don't know exactly why, but maybe everything was squared into the cylinder better, don't know for sure - in times of doubt, just go with what works.
In any case, the engine went together easily after that, I torqued everything to spec and was just about ready to go when I needed to connect the carburetor to the air cleaner. and the only real issue was that the stupid rubber duct between the airbox and the carb refused to fit. The rubber has gotten pretty hard at the carb end especially since 1973 and I'd replace it if I could, but I can't find one anywhere. I ended up cutting my right index finger pretty badly on the duct edge of the airbox when the duct slipped... lots of blood for a finger, but none got into the gearbox, so I didn't get a chance to see if it would improve performance <sigh>. BTW, if anyone has a good recommendation for a product that would soften old rubber I'd love to hear it. The research I did didn't yield much that was helpful as a permanent fix. (Drenching it with silicone didn't help, but I didn't try things involving petrol based things because I figured it would eat the rubber eventually. I did, however find a way to get it onto the carb easier... a heat gun (or even a a hair dryer) does a great job of softening the rubber long enough to get it connected.
Once everything was connected I turned on the fuel and kicked it over. Started on the first kick! I was thrilled. Of course it smoked like I'd just set an oil refinery on fire, but it ran. Besides everything inside the cylinder being new, the smoke was largely due to the fact that I had oil all over everything for assembly. Luckily the clouds subsided fairly quickly. I popped the throttle a bit and then got my helmet for a test ride. Unfortunately, I didn't really see much of an improvement from before the bore job. Also, I still had the uneven running between 4 and 6k RPM that I had previously. In general, it ran about the same, which was depressing, but it did seem to smoke a little less. After about a 10 minute test ride, I brought it back home to see what happened. I checked the compression and strangely, I saw just about the same 70PSI that I had before the new piston/bore/rings. Another puzzle was that when I tried to start it again it wouldn't start. That was odd, since it ran pretty much the same as before the work was done. In pretty short order I found that I had spark, but no gas getting to the spark plug. Normally I'd figure that the I'd gotten a piece of dirt in the carb, but I had installed a rather ugly fuel filter between the gas tank and the carb last year and thought nothing could ever get there. I'm still waiting to find a smaller in-line filter that will do a good job and fit in the space easily, but no luck yet. In any case, I took the carb apart expecting to find the clogged pilot jet...but it was clean! However, I was surprised to see the amount of grit in the carb. Not a lot, but I expected to find none. It probably only had 40 miles or so on it, but there was a reasonable amount of grit in there and I've no idea how it got there. I should have taken pictures, but didn't this time - sorry. There was a little grit in the bottom of the float bowl, but the real surprise was that it looked like the main nozzle had one of it's holes partially plugged with some sort of granular material that looked like some kind of corrosion - but I'd cleaned that carb thoroughly at the end of last year. A big puzzle, but I decided to soak the carb in cleaner for a while and try it then. After the cleaning, it started right up again and took a ride for a half hour (unfortunately it had to be short because I had work to do around the house). This time there were no bad spots at all up through the throttle range, which proved that the problem was simple dirt. I'm still shaking my head as to how it got there, but I'll be changing the fuel filter ASAP since it doesn't appear to be doing a good job. I'll check the compression again after I put a few more miles on it, but it seems to run pretty well right now.
-
Hmmm. Thanks for the reply, Paul. Very interesting. When I removed the original piston, there was a spreader ring behind each ring and the upper keystone ring was definitely in correctly. It would only fit in the groove one way and get (mostly) flush with the edge because, of course, the groove is tapered at the top to fit. However, your suggestion for the piston pin gives me an idea. The only things different this time than any other times was that the rings and piston were brand new and in a new bore. That would make the clearances slightly closer. The uncompressed new rings also spread out more than the originals at rest which complicated my squeezing them around the locating pins a little (maybe a lot if it had moved and that's what broke the ring). This was also the only time I've tried to put the piston head in away from the connecting rod. The wrist pin is snug, but fits. I have in other cases cooled off piston pins and heated the head to fit them together and maybe I could do something similar here by heating the jug (slightly) and putting the piston in the freezer for a while - even that little extra might be enough. Doing all this sounds like silly overkill for what has always for me been something that was a minor annoyance but relatively simple, but whatever works is often best.
Steve.
Minor update 7/30/11
Emotions at a a very low point yesterday when I received the new set of 1st OS rings from ebay. The rings I received had the correct part number on the box, but were definitely not the correct rings. The rings in the box were at least 1 CM less in diameter than even a standard ring set. One interesting point is that there was only one expander ring n the box as OG had expected, though. To say I was disappointed at the incorrect size is putting it mildly. However, the seller agreed to accept the return, so at least all I'm short is a a week of fun. I'll be waiting another week for a chance to try this again. It reminds me yet again that I should have been doing this when it was freezing outside and not in perfect riding weather. It certainly makes one yearn for the ability to just go to a nearby shop and get parts for this bike like I could in 1973...sigh.
-
Hi All,
have just started on a restoration of an old ct1? 175 . How can i identify the year model etc for parts and colour scheme etc Is there an web based repositories of info?
Do you figure that it is a CT1 from the engine code? CT1 was used as the start of engine codes from 1969 to 1973 I believe, even though in those years, the models were CT1, CT1B, CT1C, CT2 and finally CT3 in 1973. Here's a modification of a chart I found on the net,
CT1 Year: 1969 Start Engine#: CT1-000101
CT1B Year: 1970 Start Engine#: CT1-010101
CT1C Year: 1971 Start Engine#: CT1-200101/ A confused year. Two separate sets of engine codes. The first set was for non-reed valve engines I believe.
At some mid year point, the engine codes changed dramatically - this could be when reed valves were introduced (but just a guess on my part). At that point the codes begin with CT1-032101
CT2 Year: 1972 Start Engine#: CT1-065101 (definitely reed valve engines)
CT3 Year: 1973 Start Engine#: CT1-100101 (reed valves, gold tanks, grey/black fenders like mine)
Beginning in 1974, the engines didn't start with CT1 any longer, so you're probably earlier than that.
There is a surprising amount of parts available for these. Good Luck.
-
I really cant see what all the dufficulty is myself so long as you have
a: The top ring is keystone
b: The pin clearance cutouts the right way up
c: There is ONLY ONE expander ring to fit...in the bottom (parallel groove)

Possibly you will find it easier to fit the piston into the bore away from your bike??
Place wrist pin in the deep freexer for an hour or so
Place rags in the crankcase
Fit just one wrist pin clip into the piston
Fit the top of the piston / rings into the bottom of the bore
If you have a hot air gun or blow torch warm up the bottom of the piston (or even place whole lot in the oven for 15 mins)
Retrieve the pin from the freezer and quickly assemble to the con-rod
job done
It is a concern you said spreader rings (plural) Definitely only the one in the bottom, you will notice the bottom parallel ring is narrower...to accomodate the spreader ring behind it
Hmmm. Thanks for the reply, Paul. Very interesting. When I removed the original piston, there was a spreader ring behind each ring and the upper keystone ring was definitely in correctly. It would only fit in the groove one way and get (mostly) flush with the edge because, of course, the groove is tapered at the top to fit. However, your suggestion for the piston pin gives me an idea. The only things different this time than any other times was that the rings and piston were brand new and in a new bore. That would make the clearances slightly closer. The uncompressed new rings also spread out more than the originals at rest which complicated my squeezing them around the locating pins a little (maybe a lot if it had moved and that's what broke the ring). This was also the only time I've tried to put the piston head in away from the connecting rod. The wrist pin is snug, but fits. I have in other cases cooled off piston pins and heated the head to fit them together and maybe I could do something similar here by heating the jug (slightly) and putting the piston in the freezer for a while - even that little extra might be enough. Doing all this sounds like silly overkill for what has always for me been something that was a minor annoyance but relatively simple, but whatever works is often best.
Steve.
-
Hi All.
It's been quite a while since I've posted here, but last year I had a running good day/bad day chronicle of when I took my old CT3 out of mothballs and got it on the road again. (See "CT3 175 Runs but then Doesn't" from last summer.) I'm no expert, but consider myself more of a slightly experienced amateur. My background is in engineering, though (which my brother the mechanic never ceases to give me grief about - something about a tendency to over-analyze things). My hope is that by documenting my errors and discoveries, that I may help others.
I have lurked here once in a while, but unfortunately haven't had time to do much work related to motorcycles until recently. I have ridden both the 175 and an FZR600 I have since late last summer without much trouble, but both of them have issues that I'm starting to address now. The first candidate this summer was improvements to the CT3.
The 175 runs OK for what I've been using it for (teaching my 22 year old daughter to ride) but it's just not what it should be. It doesn't have the responsiveness that it should and burns way too much oil (I bought it new in 1973, so I know it should burn oil, but let's just say that people probably don't like riding behind it. Since I had replaced things like crank seals - which I documented in the other thread- I figured it was now time to deal with the cylinder issues.
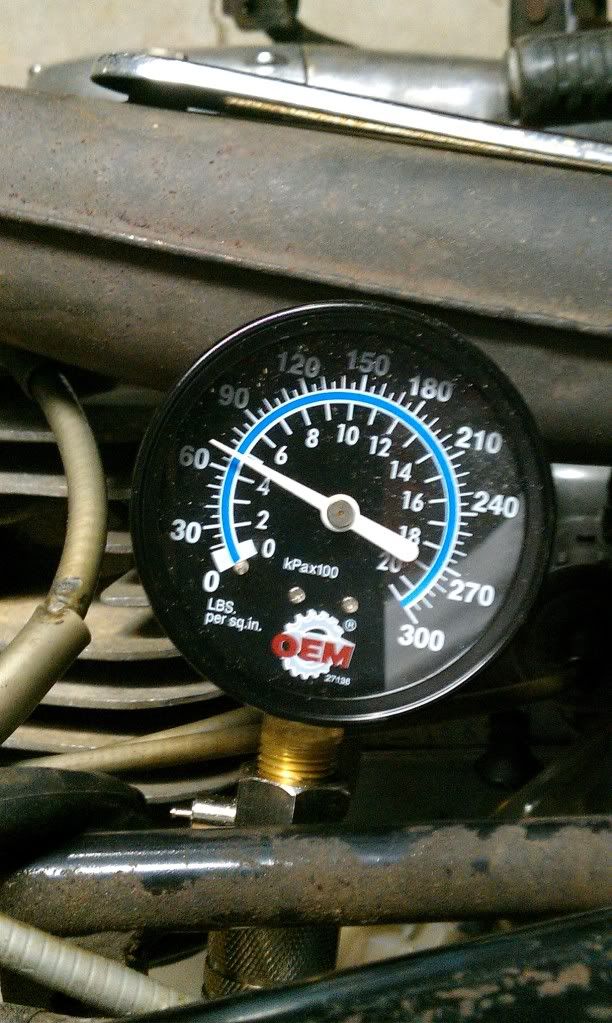
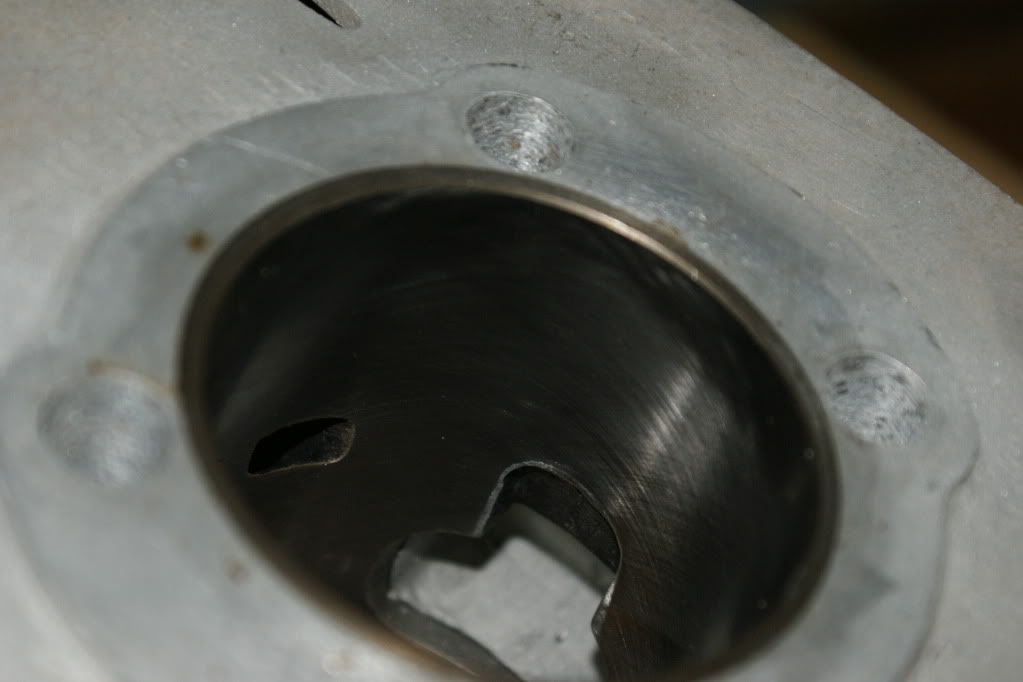
Removing the head and looking into the cylinder didn't look horrible, but certainly not ideal. A compression test was actually humorous. 3 or 4 cranks with a wide open throttle yielded only 70 PSI!
I didn't even know a bike would run with such horrible compression, but it's a tribute to how forgiving 2 cycles are, I guess. Given those results, I removed the piston and jug and took it to a machinist to be evaluated - in my opinion it was a toss up whether just honing it would work or if it needed to be bored. After putting a micrometer on the piston, with the scuffing on the sides the variance between the top and skirt was out of tolerance by a little, and the walls of the cylinder weren't fantastic, so I just took the easy road and decided to replace it and go to the first oversize about a week ago. That way I know that any minor imperfections in the bore would be fixed and by giving the new piston to the machinist, a $60 bore job meant that the tolerances should be perfect. (And they were - if anyone needs a recommendation for an good, honest, motorcycle machine shop near Boston, send me a PM.)
It took a week after my decision to get all the gaskets/piston/rings from various sources, but I got the beautiful new jug back Friday evening (yes, he works nights as well!) and looked forward with anticipation toward today's assembly... little did I know what was to come...
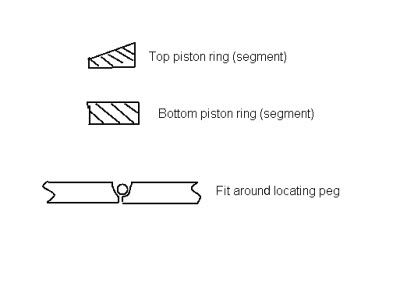
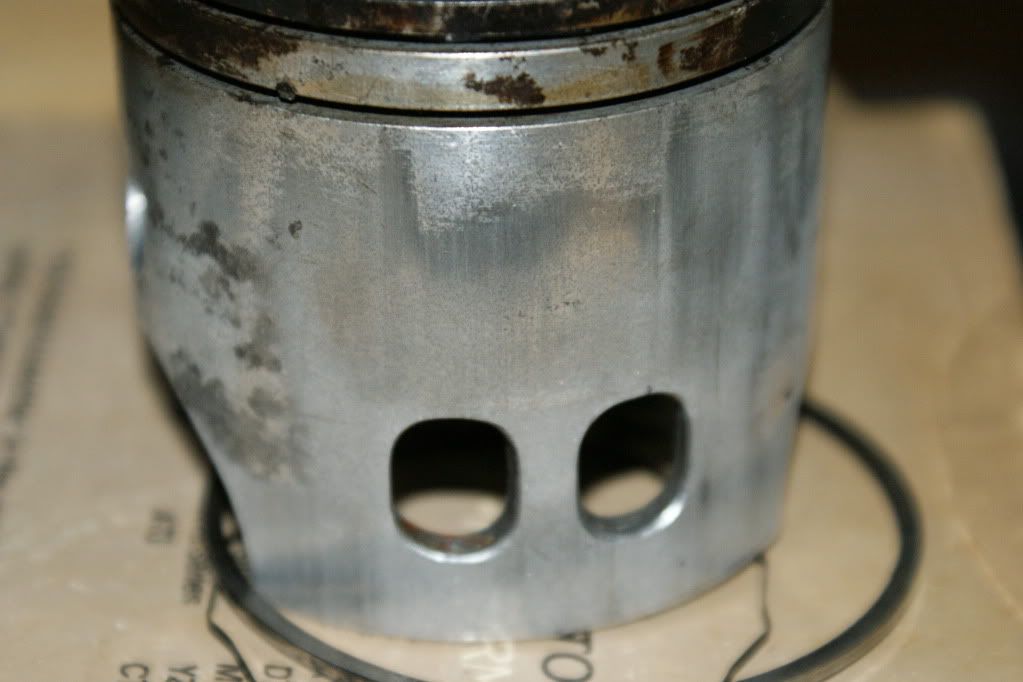
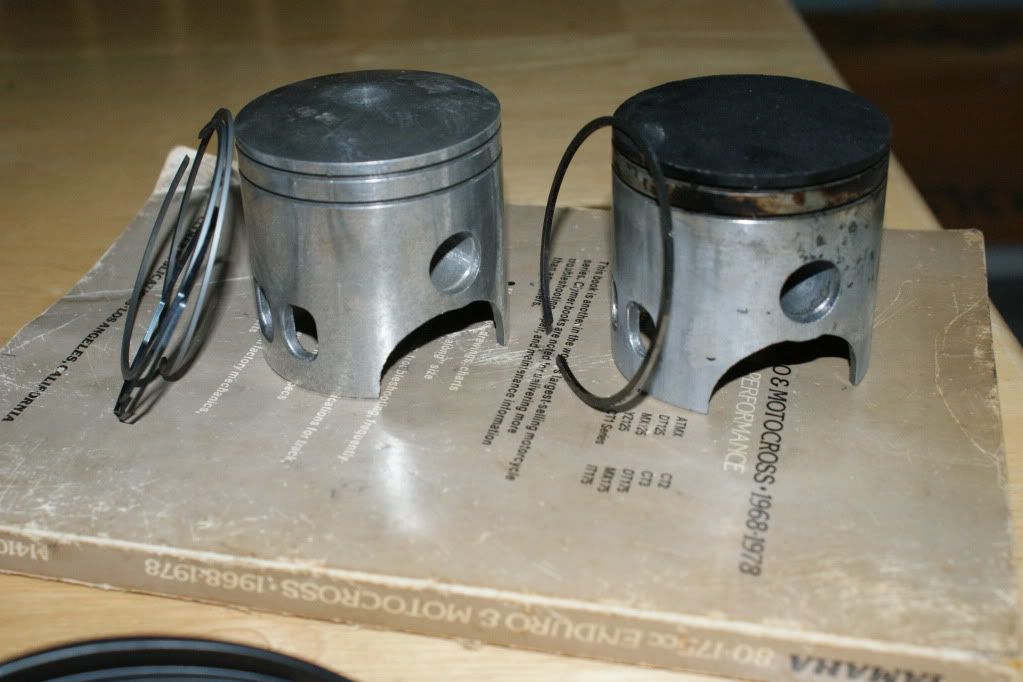
First off - if you are replacing older rings, it's pretty common knowledge that they could be either rectangular cross sections or keystone. I'd taken pistons out before and removed and replaced rings in the slots they came from, but getting the new ones was a bit of a surprise. For one, the new ones came with little spreader springs that should obviously go behind the rings, but I never found a description in my Clymer manual that they existed, or in any on-line parts exploded drawing. Add to that the fact that carbon buildup on the original piston totally hid them from me and I thought maybe they shouldn't be there on a 2 cycle engine. That was until I was fooling around and saw a piece of the springs on the old piston almost by accident (glad I found that in time). Secondly, the new piston I got had keystone rings as I expected, but only on a very close examination did I find that only the top was keystoned. The lower one was rectangular both on the ring and the piston. I never realized they were mixed, but that's where inexperience takes one sometimes. Again- I found out in time, but wish I knew it early on.
Well, after cleaning off the bored jug again (just to be sure), I was all set to assemble things. I was expecting a couple hours and then I'd bee done...not in this Universe, however.
In the past I've pulled the head and cylinder off several times, and after some rather colorful twists of the English language, getting the rings back into the cylinder just by pushing with my thumbs always got it together. The rings were always the only bump in the road, so I expected a similar experience. However, the new rings (BTW, not chrome like the originals, but a medium grey metal - maybe an iron alloy?) were much more rigid than the originals. That turned out to be a major obstacle. (Of course, I first seated them in the cylinder with a piston and checked the ring gap, which was right in the middle of the acceptable range.) I tried it several times, both from the bottom up as I usually did and then after totally failing, from the top down (caving in to pride and using a real ring compressor) but still no luck. These new rings were just too hard to keep in close enough with my thumbs and were not cooperating getting into the cylinder no matter no much oil I tried.
The final disaster for the day came when I thought I just needed to push a little harder. After doing what i usually did with the ring compressor, which was centering the ring gaps around the stop pins and slowly closing the compressor, something must have moved in there. I had been slowly twisting the compressor back and forth around the rings to make sure that the stop pin was in the gap and had been successful at least a half dozen times, but every time I was only getting the lower ring in and the top one would get stuck. This last time I tweaked the compressor a little more once the lower ring had made it into the cylinder just to hopefully get something more on the top ring while lowering it into the cylinder, but then heard a soft "tick". Fearing what it was, I looked into the compressor and saw the expected two pieces of ring where one should have been! I don't really know if the ring had moved over the stop pin or if the compressor was too tight, but I was done for the day and ordered another set of 1st oversize rings to match the piston.
Oh well. Any suggestions on the rings would be welcome, but I think I'm going to just try the new set with my thumbs again. At least that method never broke a set!
-
Hi There, BamBamwPebbles:
Just a thought...
Still no spark?
I'm not sure about this one because you said a test light would glow on kicking, which has me puzzled, but you might want to check another simple thing that goes unnoticed sometimes.
On my CT3 (and probably on your DT, but I can't be sure) the spark plug rubber cap is a right angle connection with a short wire that just pushes onto a connector on the ignition coil wire. There is no secure connection connection, it just a pushes together.
It is entirely possible that when you were removing the carb that you inadvertently put a little stress on that cable - just enough to separate the connection, but not enough to make the wire look any different from the outside than it was.
Once you've tried pushing that together, if you connect the plug and lay it next to the head and kick in the shade and still don't see a plug spart, it can be traced back. As has been said elsewhere however, don't try removing the magneto flywheel without a real flywheel puller. Including shipping it will probably cost you $16 or less off of Ebay. If you try to remove it without one, you'll likely regret it for a very long time.
Good luck. Just give a shout if you need some advice.
-
Oh, well, false alarm on getting a gas cap gasket...
Unfortunately, the web site www.langstonmotorsports.com said they had the gas cap gaskets for a CT3 (which is the same part number as for a DT2), but they called and emailed me today to say that they could not get them. I give them credit for contacting me promptly by two separate methods, but wish they had updated their web site before I got my hopes up. Back to searching for a perfect replacement...
-
Mostly for Goodfella, but maybe for others:
I may have found a place for gas cap gaskets.
I say "MAY" because I ordered one today, but can't say for sure until it shows up.
If it shows up, I'll forward the info for others (I crossed the part number to another bike and it seemed to work).
We'll see...
-
Understood.
What you describe is pretty much as I believe mine was before I did anything (with the rubber cushion ring against the hub).
The only real difference was that what you describe is from the outside in, and I described it from the center of the bike out.
The friction plates' inside diameters are pretty much outside of the rubber rings if I remember this correctly, but the metal plain plates are always touching the rubber rings.
The way I looked at it (from building it from a bare clutch basket and hub out):
First I thought I saw:
Empty clutch hub
rubber ring
plain metal plate
friction plate
metal plate
rubber ring
friction plate
metal plate
rubber ring
etc, etc.
I changed it to (building it from the inside out):
empty hub
metal plate
rubber ring
friction plate
metal plate
rubber ring
friction plate
etc, etc.
The big difference, of course, is that I started with a metal plate against the metal of the clutch hub this time rather than a rubber ring against the clutch hub. This is as it is pictured in some, but not all of the clutch designs in my Clymer manual, but is exactly how it is listed in the parts lists of the web sites that I checked out for a CT3.
You had me going there for a bit trying to figure out how your description was possible, but finally I figured it out while I was writing this.
Yours is a later model, so after staring blankly at the computer screen for a while, I looked on line at a parts list.
You have 5 metal plates, 6 friction plates, and 6 rubber rings.
I only have 5 of each type of thing!
You start from the pressure plate with a friction plate and end against the hub with a friction plate.
Since I don't have as many, I have to end differently.
I can see how the design of a DT175 is an improvement, but I have to work with what I have.
Steve.
-
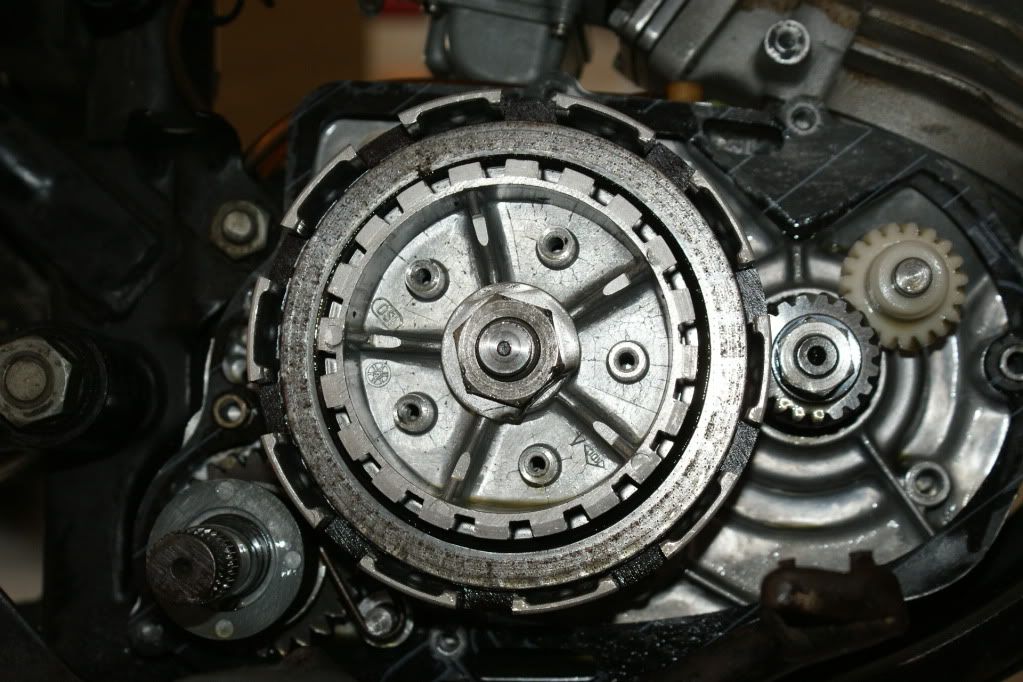
Problem Solved!
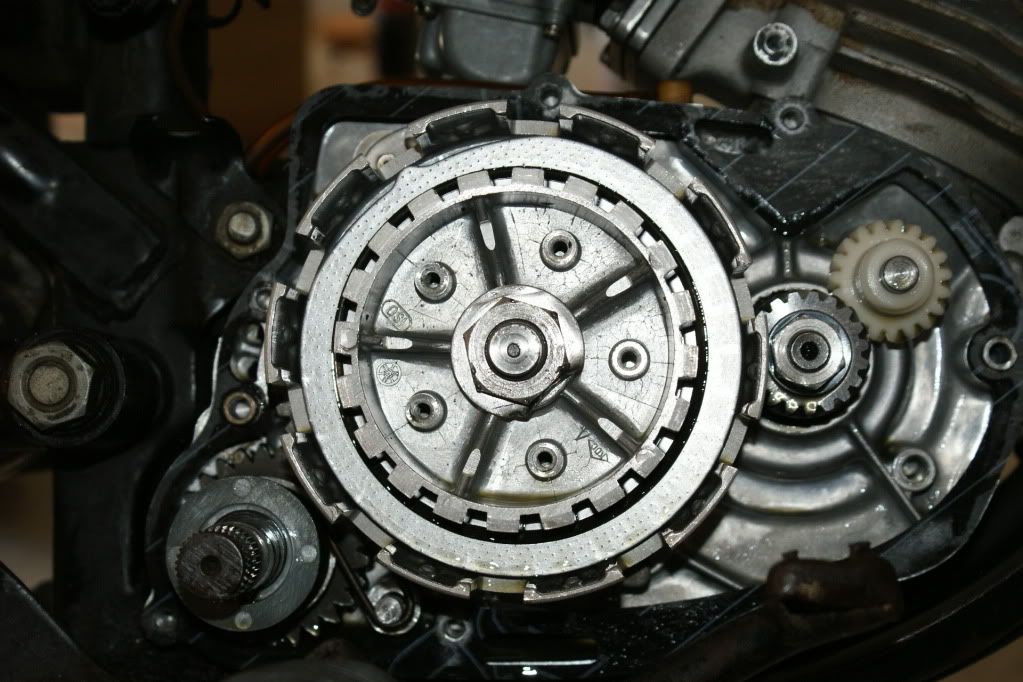
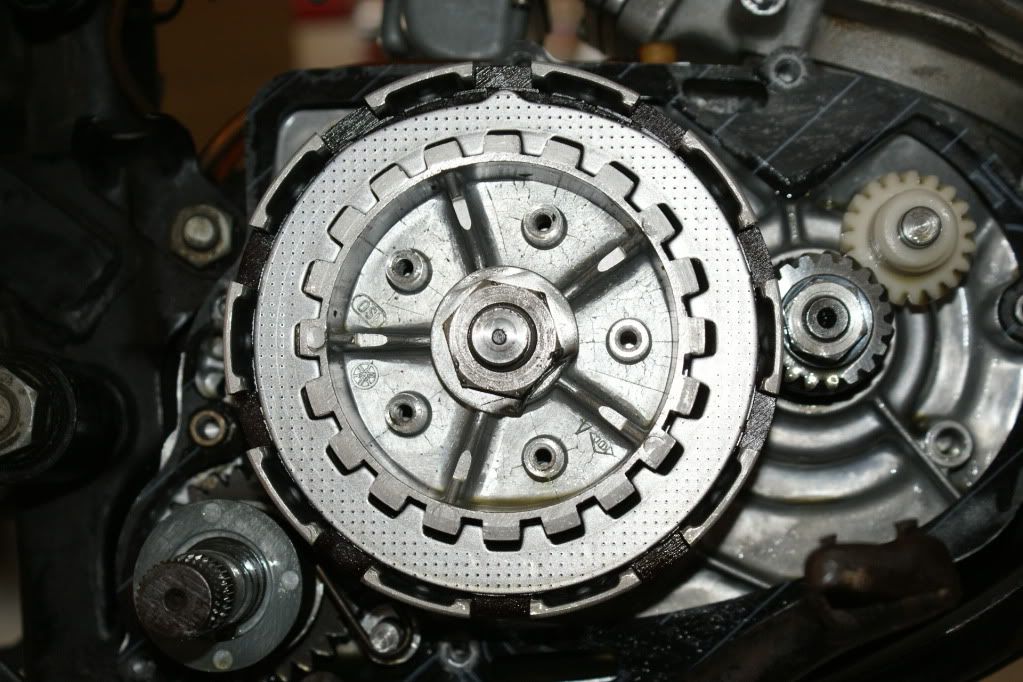
I pulled off the right side cover and took a look at the orientation of the two replacement clutch discs
Below are pics of two of the discs and one of the originals.
As you can see, the two new discs had the tabs at about 11 and 12 o'clock positions. The old ones, of course, were completely round.
I moved one of the two new disc's tabs down to the 6 o'clock position and I also tried something else - I know that a cardinal rule is never to change more than one thing at a time, but I was in a mood to break rules today.
When I first took the basket apart after its 30 year nap, I could have sworn that it started with a rubber ring before the first metal disc. I thought it was odd, because all the CT3 diagrams I'd seen had the rubber ring after the first metal disc. But anyway, I left it as it was. Well, after looking at many different sources, I decided this time to also move the first rubber ring after the first metal disc because the function of the rings is supposed to be helping the clutch disengage (but everything I've read ALSO says that the rings are not required).
In any case, I put things back together and everything works beautifully.
I'm not positive which change fixed things, but It is, nonetheless, fixed.
Thanks for the help.
Steve.
-
Thanks OG. Somehow I suspected you'd be standing by somewhere and ready to help.
My clutch adjustment is just the easy to do pushrod screw and locknut next to the sprocket and the lever adjust.
However,what you say about the metal plate tab position makes a lot of sense and would explain the change. Unfortunately, I made a poor decision in 70's and got the Clymer manual which mentions nothing about the tabs. Since I've triple checked the oil level, I'll be pulling the right side cover off to check the tab position as soon as I get another cup of coffee this morning and check back in. It's supposed to be great weather here today and the hope is to spend a lot of it on two wheels.
-
Hi There.
Well, now that I've gotten the 175 running fairly well, I have a relatively minor problem that just plain bugs me.
From another thread you may know that I replaced the clutch basket after accidentally braking one of the ears off while removing the primary drive gear.
Because of that, I used two of the existing metal clutch discs to make a removal tool and ordered two new ones as replacements.
The new clutch holding took worked fine, and all of the other work went OK as well.
However, after re-assembling everything, the first time I tried things, the clutch did not release at all no matter how the clutch lever or pushrod was adjusted.
(Neutral was fine, but first gear was totally engaged no matter what.)
I then removed the right side cover and stripped everything off of the new clutch basket.
While stripping it, I noticed no issues at all - nothing was stuck together at any step.
I then put everything back.
I made sure that all of the rubber rings had the "open" end facing away from the center of the basket, and thought I put all of the metal and friction plates back in the same order.
After complete re-assembly (including a check of the push rod and lever again) the clutch worked.
However, there is a slight drag to it even when the lever is squeezed all the way in.
By that I mean that if the clutch lever is squeezed all the way in, the bike is never quite all the way out of gear - it wants to move a little.
Since I have no idea what I changed, I'm at a loss.
The only thing I could think of was the pressure plate screws, but I checked them when I replaced the plate and put them in just barely snug to the metal as the manual describes.
The spring height is perfect as far as I can measure.
If I try to adjust he clutch lever to make the clutch release all the way, it appears to work, but I know doing that is wrong - there should be a small amount of play in the lever and the push rod should be adjusted until it seats and then backed out a tiny bit as per the manual. Both were adjusted exactly as per the shop manual.
Does anyone have any ideas as to what in the world I might have done incorrectly in the clutch assembly?
BTW, I'm using Yamalube for the crankcase oil, so it's not that.
The clutch worked fine before the 2 plates were replaced, so I do have a good starting place.
I will point out that the new plates (from Yamaha) did not look EXACTLY like the originals; they were not completely circular, but had small tabs sticking outside along the circumference of the circle them that the originals didn't have.
The new basket is a NOS (New Old Stock) piece, so I know that's fine.
Any guesses would help.
Thanks.
-
You are quite welcome. Happy to be of service. We all just trade information. There are certainly wiser heads here, but I may be able to fill in a few blanks just by virtue of experience. You'll probably find a few things as well that we can all use.
Definitely familiar with the "falling apart in my hands" situation with the gas cap! My situation was eerily similar.
As far as the gas tank gasket, after searching myself, I have sadly found no source for a "real" one. I've seen several have used marine gaskets, and right now I have something just cobbled together while I continue my search for something better.
I do find it really strange that we can buy just about every rubber part on this bike but two that I've searched for - the gas cap seal and the rubber duct from the airbox to the carb. In that regard, here's something I learned there that may help you: The duct on mine had lost a lot of its flexibility since 1973. It was so stiff after so many years of sitting that it didn't want to fit correctly when I replaced the carb - it kept coming off of either the carb or the box when I tried replacing the carb after my soak and rebuild. I tried silicone spray to soften it, but with only limited success. After accepting that I couldn't replace it, I later learned that I could manage the stiffer duct much more easily by removing the exhaust pipe, which is held on by only one bolt under the seat (that feeds through a grommet that you might end up replacing) and a spring at the cylinder jug. The extra couple of minutes with the remove/install of the pipe is more than offset by not having the incredible frustration of trying to get that silly duct in place on BOTH the carb and the airbox. Being able to get at it from both sides makes it a couple minute install where I'm sure it's square on both the carb and the airbox rather than wondering if it's slightly off of one or the other after the manipulations.
-
OG:
As far as being back sometime, you won't be done with me that easily. Everyone here has been great just to bounce ideas off of and get some needed wisdom from. I'll be tinkering with things for quite a while yet just because it's something I like to do.
Who knows, it's even possible that I could help someone else avoid the holes I've fallen into.
Steve.
-
As far as the tank, it shouldn't be a big problem. First, of course, you'd need to shut off the fuel and disconnect the fuel line from the carb with either the spring clip at the carb end or the petcock end. (Plan on buying a new rubber piece for the inside of that petcock, BTW. Mine leaked like a sieve because it had dried out). In general, if there is a rubber seal someplace, you'll probably be replacing it before you're done. I'll leave it at that for now and not spoil some of the surprises. Luckily, with the exception of the gas tank cap gasket, they're mostly pretty easy to get.
Anyway, then lift the seat and you'll see a rubber band that holds the rear of the tank down to the frame (or, in a lot of cases there was once one there, but it broke and was forgotten years ago). Once the band is off, just sort of wiggle the tank diagonally up toward the rear. There are two hollow rubber discs that are in slots between the tank and the frame that keep pressure on the tank to hold it in place. There are no real bolts or screws of any kind normally. It's just held in by rubber. Of course, it could certainly have hardened over the years, making it hard to move, but that's all there is.
As far as the fuel filter, I'm using one now, but don't recall the number off the top of my head - mostly because I still hate it. The darn thing is still way too big, but it works fine (which was a big step from most). I'll see if I can find a receipt or a box somewhere with the number, but I'm really still searching for something better.
Good Luck!
-
Update for Aug 19th
SUCCESS!!
My CT3 is finally running! Let the bells ring out and the townspeople rejoice!
Here's what happened late today:
After the prior compression tests showed a horrible 65PSI, I wanted to see why.
Took off the head and cylinder They looked OK. No significant scratches inside the bore to account for leaks.
Checked the ring gap and it was outside of spec - about 0.019 vs 0.014 max spec. That would account for some poor compression, but probably not all (but I'm guessing there). Unfortunately no new rings on hand. However, it ran before without new rings, so pressed on.
Didn't have good micrometer to measure piston clearance, but no evidence of scoring or cosmetic issues.
Reassembled piston and cylinder, leaving off the head in order to check timing.
Installed dial indicator and checked timing of original points at 0.071 Before TDC.
Didn't write down what it really was, but it didn't appear close to correct.
Removed the points and checked them. More pitting than I'd noticed before, but not horrible.
Ordering new ones and a new condenser, but for time being, filed existing one with a point file that I still had from the 1970s (!), then cleaned and reinstalled them.
Now decided to check out stator coils again and saw that a splice I'd made in a wire from the source coil probably in 1974 had a small bare metal area that just might occasionally touch the flywheel if things vibrated enough (as in max throttle when it always died in the past). Possibly a stretch, but plausible. I removed the splice and cleanly soldered and insulated the new splice, tucking it safely out of the way between the coils. This was very promising for my intermittent stall problem, but no guarantees.
Next replaced the flywheel and set timing.
Timing was a bit annoying, because every time I tried to tighten the set screw, the points moved slightly. Got frustrated at one point (puns are everywhere)and settled for just opening at about 0.068 - much better than original, but a bit advanced from the 0.071 spec.
Replaced the head with new gaskets top and bottom. Took a small risk and cheated on the torque by tightening the bolts to a fraction of a ft lb more than 14.5.
Checked compression. Now tops out at just under 70 lbs. Bad, but better.
Connected everything and kicked it a couple of times. Nothing.
Squirted a couple of CCs of gas from a syringe into the spark plus hole.
Kicked it and it fired up first time! Problem was that it was locked wide open from the compression tests (I had thought that the throttle felt too loose) so I immediately shut it down.
Cleared the stuck slide in the carb, cleared the cables that were not smooth under the tank ad tried again.
Started on first kick and seemed to run pretty well.
I put on the helmet and took a quick spin around the neighborhood although it was starting to get dark.
After a short return home, went on longer circles around the neighborhood. Finally went on a 3 mile one way trip to the gas station and it had no issues. It was completely dark now and didn't want to push things at that hour, so upon return home decided to quit for the night. However, I did wind it up a bit in the last mile home to around 7k RPM and all was still good!
The engine still isn't as smooth as I remember it being, but at this point it rides well enough as long as everything holds together.
Tomorrow the plan is to go for a ride with my daughter on the CT3 and me on the FZR600. I will check on that intermittently sticky carb first, though.
I plan to deal with oversizing the piston, and whatever else needed to deal with the compression in the off-season. I also might replace that carb that seems to refuse to act politely no matter what I do. The plan is also to continue to restore the bike rather than just make it safely rideable, which was the mission this time.
BTW, I never did find anything that was definitely the cause of the clutch not disengaging as I described previously. I took it apart and reassembled it the exact same way as far as I could tell. It could still use a slight adjustment, but it was fine.
Oh yes, when I first started it up, it smoked like an aircraft on fire, but it quickly got better. By the end of the ride it was only slightly more than I remembered. I'll check the autolube pump next time to make sure it's not burning too much.
For the time being, life is good.
It took longer and took more cash than I'd expected, but for now, I'm living the dream...
-
First off, thanks for the notes on the stator screws. I'll be checking that out a little later on.
As to the suggestion of the exhaust blockage, it seems clear. I was easily able to blow and suck air through it with my compressor and shop vac.
At this point, I'm a bit baffled by what's been going on with the repair/restoration, though.
I was getting a lot of smoke as I said, and the clutch wouldn't disengage, so I tore it down again to see what I might have messed up.
Replaced both left and right seals again (boy was it easier after having the experience of doing it once).
Took apart the clutch basket and saw absolutely no obvious issues.
Scratched my head a lot, but after coming up with no answers I reassembled everything, checking myself wherever possible along the way for correct movement in the clutch, and general careful assembly.
Problem was, that when everything was finished, it wouldn't even start!
It sputtered (more like farted) once or twice through the exhaust, but nothing meaningful.
I checked spark with the plug (which looks good) lying out against the head and it seems OK; thought it had gas, but nothing.
Tried putting a bit of gas directly into the plug hole and kicked it, but nothing.
About the only thing different in assembly was that I had some help putting on the head gasket and thought it might have been put on incorrectly, so I got a compression gauge to see if there was anything strange there.
With wide open throttle, it went to 30PSI on the first and stabilized at about 65 by the fourth.
To me this seems very low and maybe not enough to run, but since my old gauge broke early on, I have no reference point. I know it should be above 100, but will it run this low?
I wonder if I scratched a ring or something in installation of the cylinder, or if one spun around in its groove while holding it for installation...
In any case, it's another trip to the dealer for a couple of head gaskets (one for spare) and I'll take everything apart again. If I had more time, I'd probably oversize the stock piston and bore it right now. However, it's less than two weeks before my daughter goes back to college and I really want this done first. I will, however, check the ring gap when I tear it down, which I didn't bother with before, because even though it was intermittent, it was running. At this point, I'm dealing with something that WAS running before the repair and now isn't, so it's most likely something I did, otherwise I'd be checking all kinds of other things. For completeness, though, I think I'll pick up a dial indicator and check the timing while the head is off though, because even though it has spark, it could be in the wrong place (I can't imaging it changing during the repair, but it was something I'd wanted to check, but hadn't.)
On a better note, to calm my nerves, I took the FZR600 out for a spin for an hour or so last evening now that it runs. I still need to find a miss in that one, but all in all it's OK. (I think there's a cylinder imbalance there because the exhaust pipes have a significant temp mismatch when I point the IR temp gun at them.) Riding is simply a magnificent non-chemical way to relax.
-
Well, OG, I have no idea what I'm doing differently now, but I now can post pictures just fine now (I'll chock it up to evil spirits).
Did a lot of bike work this weekend. I got the FZR running, which I'll post separately, and did a lot on the CT3, which I'll cover here.
Short story, everything's assembled, but I still have operational issues with the 175.
To summarize all the work since it was last running:
Replaced left and right crank seals.
Replaced a couple of clutch discs, but only because I sacrificed two to build the removal tool. The existing ones were fine.
Replaced the clutch basket because I was a dolt and broke the original trying to take off the primary drive nut before Mr. OG filled me in on a great way to hold the nut by using a 1/2" extension in the top of the connecting rod (thank you, thank you, again).
Replaced the kickstart seal.
Replaced several pan head case screws that had been distorted during removal.
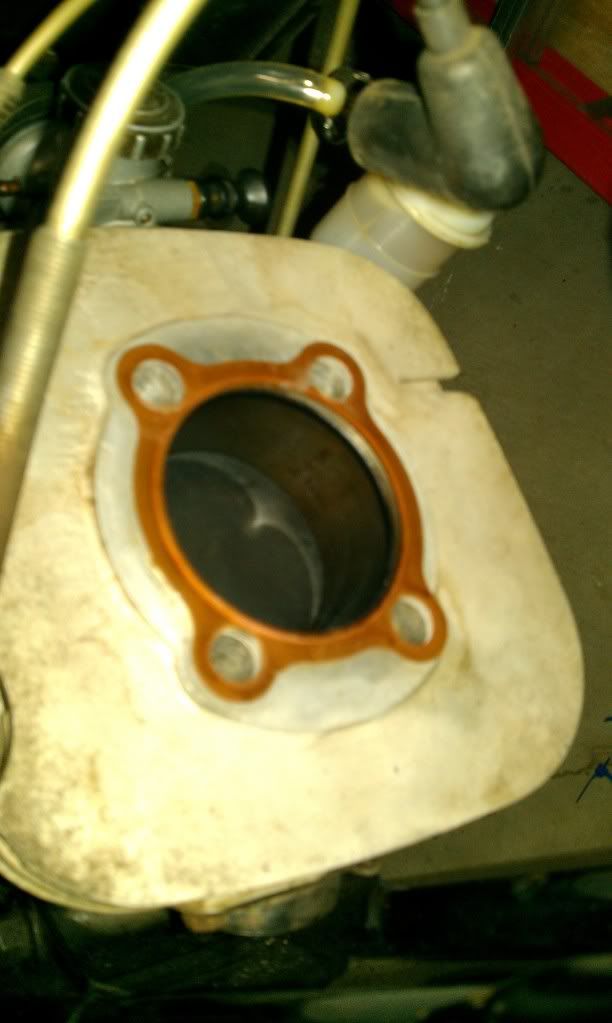
Replaced the gasket at the bottom of the cylinder, the head gasket, the left and right case gaskets.
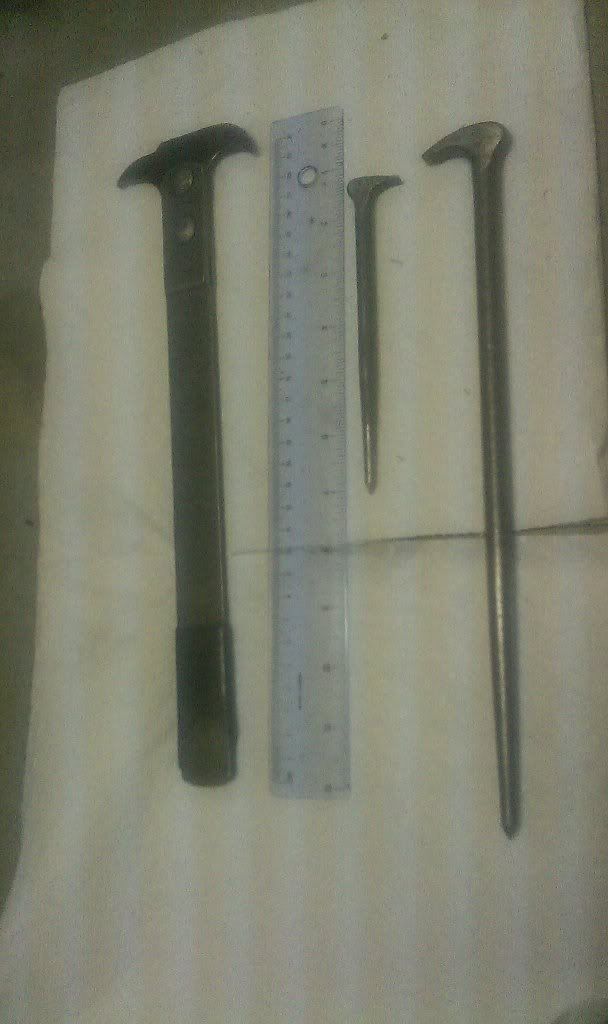
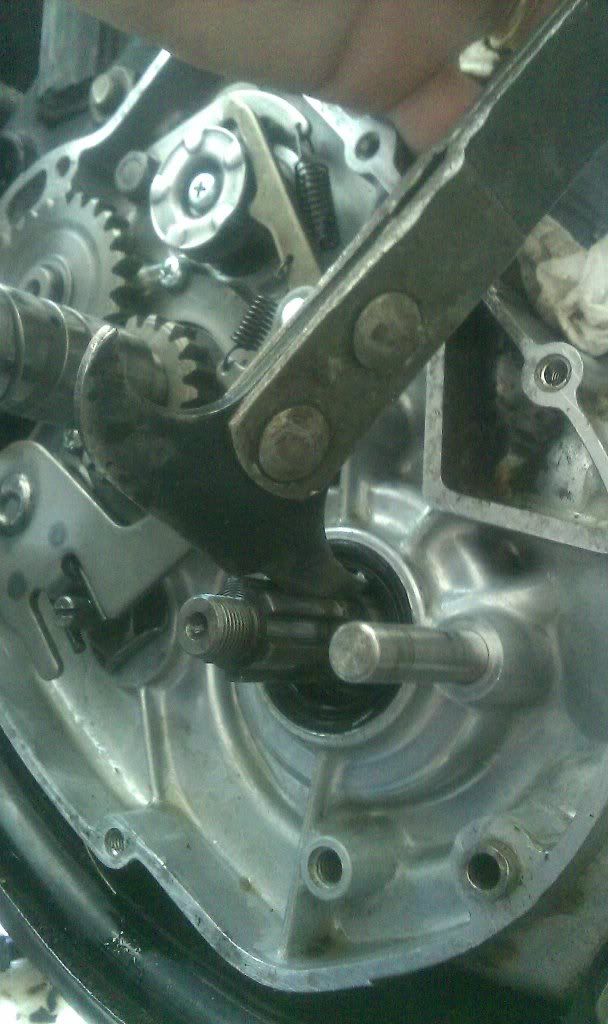
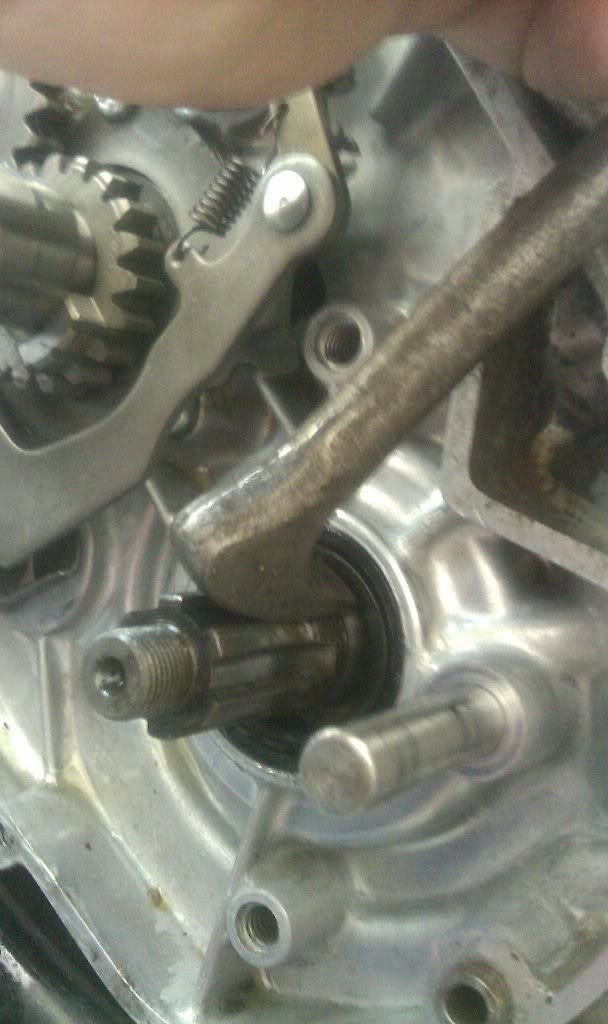
I was asked about some tools and procedures, which I'll describe here. (Apologies in advance, but my good camera wasn't around today, so I used my cell phone camera instead.)
First, alongside a ruler for scale, is a picture of the 3 seal pullers that I borrowed from the lead mechanic at my brother's shop.
If you've never used a seal puller, they make life much easier. They allow you to take a seal out of something with the shaft still in the way (and avoid splitting the cases). The one that looks like a miniature hammer has pointed ends that you continually sharpen with use. My mechanic friend uses this one a lot with transmissions, but it was great here as well. Keep in mine that a crankshaft is hardened steel so you're not going to easily hurt it. Place the head along the length of the shaft and the point toward the seal edge. Now hit the other side of the head with a hammer to embed the point into the seal (don't hit it too hard or you'll damage the aluminum case, of course). Once you have a grabbing point by doing this, you can pry the seal out. Sometimes (as in my case) I started with the big one and then used the smaller one to finish pulling it out just because of the tight spaces becasue the engine was still installed in the bike.
A few more pics are below:
As you can see, these tools aren't complicated, aren't expensive, and really come in handy. If the seal has a convenient metal collar, as in the magneto oil seal, a wood screw can take it out, but if it doesn't, like the right crank seal, a seal puller can be your best friend (it's only fault is that it will never buy you a beer - but it may keep you from needing one).
Back to today's work:
I completed the assembly, put in a little less than a quart of Yamalube (splurging on the mfr recommended stuff), torqued everything I could to factory spec from primary gear to clutch basket nut, to head bolts; turned on the key, saw the neutral light, and prepared to hear my future...
A couple of kicks with nothing because the carb was dry, but then if fired up.
It sounded pretty good. Hard to describe, but more even, solid combustion than before the work. I started to think I must have had a leaky head gasket or something because of how even it now sounded.
Then, a second or so later the smoke started.
Let's just say that if there were any mosquitoes in the area, they were gone now.
I was hoping that this was just because I had oil all over everything with the assembly process, but it sure was a lot of smoke.
I idled for a minute or so, then bounced the throttle a few times and it seemed much more responsive than before.
It was still smoking like it was trying to attract aircraft after a few minutes, so I shut it down to check things (I wondered if it was burning engine oil through a badly installed seal. The collar under the primary drive gear did have a small scratch on it that I had repaired with JB weld, but I thought it wasn't a real problem. I considered waiting for a new collar but decided to take my chances that I might have to do it all again later (summer only has a few more weeks left, which might be causing me to make bad decisions - I need to start these projects in mid winter).
After sitting a bit during dinner time, I tried it again. Less smoke, but still there. Checked the oil - it was OK.
Unfortunately it was getting dark so I couldn't do much troubleshooting that involved running the engine in deference to the neighbor kids' bedtimes, so I'll just talk about the other two problems that showed up at that point. I'll still be on vacation Monday, so I'll go into the breach yet again, but if anyone reads this and has a suggestions, I'm all ears.
The first problem that showed up was that the clutch was not a clutch. It was a constant connection to the engine. Not so efficient to have all those parts doing nothing important...
I shut things down and checked the cable play which wasn't right, and also the actual clutch adjustment next to the magneto, which was also off by about 2-3 turns of the screwdriver. I adjusted everything and tried again.
Still no clutch. Did I reassemble something incorrectly? The two new metal clutch discs were not exactly the same as the originals - they had a sort of a tab in one section on the outside, where the originals were perfectly round. I hoped it wouldn't make a difference. It didn't look like they would bind up anywhere. When I reinstalled the pressure plate screws, the manual said to make them just snug, which I thought was odd. They were really tight when I removed them, but I went by what the manual said. Maybe that is it? Also, I noticed that squeezing the clutch seems to put a lot of stress on the left side cover I hadn't tightened an allen screw quite all the way which made that apparent. There may be something just not lined up there. I hate to pull that right cover off, and I'll check the lineup on the left side first, but I'm probably going to have to pull the right side anyway. I hope the gasket will withstand another compression on that side. If I pull that side, I'm expecting that if I squeeze the clutch cable I should see movement there (which a good mechanic might have checked before buttoning things up *sigh*) but we'll see what develops.
The second problem was more disturbing. I seem to have a limit of run time. It was as if I was running out of gas after a few minutes each time it was started. The tank is on reserve right now but still has gas. However, I'll fill it and check again tomorrow. What bugs me is that this could be similar to my former troubles, which has me very worried.
In any case, tomorrow is another day. This will get figured out somehow...
-
Well, I'll give the photos another shot later on today when it's calm. Every time I think I have a few brain cells that still work, something like that comes up to put me in my place.
I went to the FAQs originally when I tried to post a picture of my "rusty, then clean" tank in the Bar area and I thought I had everything all set. Got a Photobucket account, copied the pic "img" info into the body of the post, but all I got in the post was the address. However, when Vez replied, the picture was magically there. I'm sure it's just something stupid I've done, however, and I'll check it out later on.
Re the gasket, the heat gun would have been my first choice as well, but I'd loaned it to my brother to take some old window glazing off, and I was too lazy to go and fetch it.
I did think it was slightly odd to have gasket cement there, but some sections were sure stuck on there. I didn't really notice a huge amount, but they were practically welded in place in some sections, so figured it was cement.
-
Update Aug 7 10 PM
Using Seal pullers (one medium sized and one small)the right seal came out with only a minor amount of trouble. If I ever figure out how to solve my picture posting issue, I'll post some with the pullers I used. With the primary gear off and the collar pulled out, the seal puller is placed against the crankshaft and rapped with enough force to dig into the seal but not past it into the crankcase. For those that haven't used seal pullers before, note that you don't try to get it behind the seal, but actually dig slightly into the metal around its edge. Then the seal was pulled away with no damage to the case (I was very careful not to hit the puller too hard with a small hammer, but just enough to grab the seal). Then I spent quite a bit of time cleaning away all of the old crankcase gasket material in the area around the kickstart, clutch area, etc. I didn't have anything that was a good solvent for the old gasket cement lying around unfortunately. A small torch and a putty knife came in handy for some of that - just be careful to protect surrounding parts with something to deflect the heat. I used some scrap heavy aluminum flashing and a wet rag for that. It now looks all shiny and new and I'll work on the re-assembly tomorrow. We'll then see if my problems are really solved.
BTW, on my other project, I finished installing the 4 carbs I rebuilt for the FZR600. Syncing proved to be pretty simple using two soft drink bottles with 1/4" plastic tubing from them to the vacuum taps on the boots. I was surprised that it was so easy on a Saturday to locate 6mm MIG tips from a hardware to screw into the holes in the boots. I had seen descriptions of this method around the web for a while and understood the principles involved, but it was the first time I'd tried it, and it worked like a charm. It was readily apparent that there was some imbalance and it was easily corrected. My bottle construction was a little different from some I'd seen based on personal preferences (like making it impossible to get fluid into the cylinders) but nothing that anyone couldn't think up on their own in a short time. The only change I'd make doing this again would be to use plastic bottles that were larger (2 liter maybe?) and use some that were more rigid. At higher RPM, the bottles had a tendency to start to collapse, which was a little comical. Maybe even glass bottles with two hole stoppers on each, which would be more rugged and would stand up to much higher vacuum. It certainly would have been simpler/faster to have a 4 line vacuum gauge setup, but this was quick, effective, and only about $7 in parts. Plus, if I get to play mad scientist once in a while, it keeps me sane...and made a few curious neighbors suspect I wasn't quite sane, which was even better. Main parts of the FZR600 project are now completed. It will need a few tweaks here and there and a set of fork seals, but seems to be quite rideable in it's current form.
-
Aug 6 mid-day Update:
Received my new clutch basket in the mail today.
Using The OG's suggestion, put a 1/2" extension through the top of the connecting rod, padded things, and the it held everything easily while I removed the primary gear nut. THANKS!
Removing the right crank seal is proving to be difficult, however.
Unlike the left seal, there is no metal collar to easily put a screw into for removal. When I tried, it just tends to shred.
The space available is too small for any of my gear pullers to fit.
I'm considering heating things up with a heat gun or torch and then trying to pry it out, but before I risk damaging something, does anyone have any suggestions? I'm off to the store to see if some sort of seal removal tool to help, but if anyone happens to be at the computer and has done this I'd be much obliged.
Thanks.
Aug 6 Update 11:40PM
Spoke to my brother and one of the mechanics at his shop today and borrowed a few different seal pullers. We'll see what happens this weekend...however, first task will be to finally see if the 4 carbs I rebuilt this week for the FZR600 work as they are supposed to and finally allow it to rise above idle without stalling. That will be first in case it works and I can get it inspected before the shops close for the day on Saturday. I ran out of time after fitting them in today and had to stop to go out for the evening. Synchronizing them may prove to be lots of fun since I've never tried that before. I'll probably do a separate thread on that project later if I think it will be useful to anyone.
Cheers.
-
Thank for the suggestion.
In this particular case, I was careful to check the float height when I cleaned the carb after the first several mile walk home. It was exactly as per the spec in the manual, which didn't surprise me, since I've owned this since it was new and have never messed with it. Of course when I was in the Service in the 70s, it was home with my brother. Interestingly, for some reason, every single time I came home on leave there was a turn signal that needed to be replaced, a new scrape, or some other strange change (and also many more miles on the odometer). When I started working on this project a few weeks ago I told him I'd be tearing the engine down to replace a lot of things because of age, which caused him to inform me that the head bolts were slightly larger than standard now. Interesting how that little fact was never conveyed over the years. I would have been a bit more upset and looking for someone to blame for my current troubles were it not that my brother (then 19 to 22 years old) was then starting out and is now still an excellent professional mechanic. The bike ran many, many miles after whatever he did, but those little surprises could mean some other wear in places I didn't expect. (He seems to recall that he was removing carbon, but during those days it could have been exploratory surgery, knowing him).
So, in this case, I'm hoping that when I have replaced the crank seals (among others) and verified timing, etc, that I will have solved my problem. I'm still not convinced entirely that I'll have solved it, but finding that extra oil on top of the piston when I tore it down after the last failure and the strange carbon wear pattern on the head make me think a head gasket leak combine with a seal problem. We'll see. My shiny new clutch basket should arrive in a couple of days and I'm eager to give it another go. Vacation time is schedule starting tomorrow for two weeks, so I'll have a lot of time to figure this out.
-
You are of course correct. Heck, the rod take the force from repeated explosions above it and has no issues; but I'm sort of like the dog that just got bumped by a car crossing the road and then is scared to go near the curb for a while. I may return to reality before I actually do anything.
-
Thanks Paul:
I was obviously pretty depressed last night writing that.
What a difference a good night's sleep makes, however.
I considered writing nothing until I had solved the problem, but then thought that for me at least, the journey is as important as the destination and my bit of failure might help someone else. The satisfaction (and sometimes pain) of figuring out a problem is what makes it better in the end. And while I wasn't necessarily looking for help, part of this group is that there was always the chance that those with more experience, such as yourself, could offer a totally new way - which you certainly did. The idea of using the piston rod was a clear description of an excellent method that I'd not considered. They cylinder and everything else is still in pieces, so doing it that way would be a simple matter. Given that I'm a bit gun-shy now, I may try that along with a rag in the primary to distribute the force, but Lord knows, I have time to figure this out before a new basket arrives (though may try later today if there's time after the FZR work).
In my hunt for a replacement basket I had also started looking around and was finding both ends of the spectrum as you saw as well - from a $155 new to $35 questionable condition. I had somehow not seen the $99 one. It looks like the NW Vintage and Vintage may be different places because they have different store sites. However, you may have saved me a third of the money for the same thing, because I may end up there.
In any case, thanks again for your comraderie and wisdom. Onward and upward!


CT3 Runs OK, But Maybe I can Fix That!
in Classics
Posted
Sorry - it's been a while since I've been here....
Yes, very weird that I had dirt in the carb again, but it was there. I found a new fuel filter that fits pretty nicely, so I should be good from now on.
I know what you mean about the compression test - I was expecting over 100 psi as well. (Yes, I was at WOT when I did the test.) It really would annoy me if it was bored too wide. I may have to get a caliper and measure it. I will check it again this weekend since I now have quite a few more miles on it. Oil consumption seems better, but it does appear to use a little more gas that I think it should. It seems to run just fine now, but I do remember it being a little snappier when it was new...but of course I was 17 then and I think Pink Floyd had just started singing "Money" or some such. As my kids would say, nothing that was a memory from a time when large reptiles had just stopped roaming around like that is guaranteed!